Every file Moodle serves goes through PHP by default. On sites with large video files or a high number of concurrent downloads, this ties up PHP-FPM workers for the duration of each transfer. Enabling X-Sendfile transfers that work to the web server, freeing PHP instantly.
Why PHP file serving is a
bottleneck
When a user accesses a file in Moodle — a video, a PDF, a SCORM
package — the request goes to pluginfile.php. Moodle checks
permissions, resolves the file from moodledata, and streams
it back to the browser. While the download is in progress the PHP-FPM
worker is occupied: it cannot serve other requests.
A single 500 MB video streamed to a user on a slow connection can
hold a PHP worker for 10–20 minutes. On a site with a limited FPM pool,
a handful of concurrent video viewers can exhaust all available workers,
making the entire site unresponsive.
How X-Sendfile works
X-Sendfile is a mechanism where PHP sets a response header instead of
sending the file body. The web server intercepts that header, locates
the file on disk, and streams it directly to the client. PHP exits
immediately — the FPM worker is released.
The header name differs by web server: – Apache:
X-Sendfile (requires mod_xsendfile) –
Nginx: X-Accel-Redirect
Moodle has built-in support for both.
Apache configuration
Install mod_xsendfile if it is not already present:
In your virtual host configuration, declare the paths that Apache is
allowed to serve via X-Sendfile:
XSendFile On
XSendFilePath /var/moodledata
XSendFilePath /var/www/moodle
The path must match the real filesystem path of
moodledata and, if your theme or plugin serves files from
the Moodle root, the Moodle directory as well.
Nginx configuration
Add an internal location block that maps to your moodledata
directory:
location /moodledata-internal/ {
    internal;
    alias /var/moodledata/;
}
The location name is arbitrary — it just needs to match what Moodle
will put in the header.
Without X-Sendfile the response body comes directly from PHP. With
X-Sendfile the PHP response will have Content-Length: 0 and
the X-Sendfile header will be present (stripped by the web
server before sending to the client, but visible in debug mode).
A simpler check: watch FPM worker utilization during a large file
download with
watch -n1 'php-fpm8.2 -t 2>&1; ps aux | grep php-fpm | grep -v grep | wc -l'.
Without X-Sendfile the count stays elevated for the duration of the
download. With X-Sendfile the worker count drops back to baseline within
seconds.
Caveats
moodledata must not be web-accessible directly.
X-Sendfile only works because Moodle’s PHP code runs first to enforce
access control. The web server then serves the file after PHP has
authorised it. Never point a public Alias or
root directly at moodledata.
Symlinks: if moodledata contains
symlinked directories (some backup or filedir configurations do this),
ensure mod_xsendfile or Nginx is configured to follow them,
or the file lookup will fail.
PHP memory: X-Sendfile also eliminates the memory
overhead of reading the file into PHP before sending. This is
particularly relevant for ZIP files or large SCORM packages where PHP
would otherwise buffer the entire file.
Moodle's web services let external systems read and write data through a single REST endpoint. Getting from off-by-default to a production-grade integration requires understanding the authorization layers, the functions worth knowing, and the failure modes that only surface under real load.
How Moodle's web services work
Moodle exposes a single HTTP endpoint — webservice/rest/server.php — that dispatches calls to hundreds of registered functions. Each function has a name like core_user_get_users_by_field or core_enrol_get_enrolled_users and a typed parameter schema. Every call follows the same shape:
POST /webservice/rest/server.php
  ?wstoken=<TOKEN>
  &wsfunction=<FUNCTION_NAME>
  &moodlewsrestformat=json

Body (application/x-www-form-urlencoded):
  <function-specific parameters>
Both GET and POST are accepted — Moodle's own documentation describes this as "not RESTful". Every call, regardless of HTTP method, goes to the same server.php script. The moodlewsrestformat=json parameter controls response format; without it you get XML. Most application-level errors are returned as JSON in the response body with HTTP 200, so your integration must parse the payload rather than rely only on the status code. The exception is infrastructure-level failures: if the REST protocol is disabled in Moodle, the server returns HTTP 403 before any application code runs.
Arrays in the POST body follow PHP's bracket notation, not JSON. A call to core_user_create_users passes its payload as users[0][username]=alice&users[0][email]=alice@example.com&users[0][password]=... — not as a JSON array. Sending JSON will produce an invalidparameter error with no further explanation.
Three conditions must all be true before a call succeeds: web services are enabled globally (they are off by default), the function is included in an external service that your caller is authorized to use, and the calling user holds the capabilities that the function requires. Miss one and the call fails — typically with a webservice_access_exception for access control problems, or a moodle_exception for conditions like a suspended account, an expired token, or site maintenance mode. Most integration failures trace back to a capability that was never explicitly granted.
On protocols: Moodle officially supports REST and SOAP. XML-RPC was removed from Moodle core in 4.1 when PHP dropped the php-xmlrpc extension; a third-party plugin exists for sites that need it but it should not be used for new integrations. SOAP has known WSDL compatibility issues with Java and .NET stacks (open tracker items MDL-28988 and MDL-28989). Use REST for all new work.
The authorization model
Authorization works in three stacked layers. Understanding all three before you write a line of code saves hours of debugging later.
External services
An external service is a named bundle of functions. You create one per integration — "HR Sync Service", "Reporting Exporter" — and explicitly add the functions that integration will call. Functions not in the service cannot be called regardless of what capabilities the token holder has. The service can be restricted to a list of authorized users, which gives you a second line of control beyond the token itself.
The service user
A token belongs to a Moodle user. For integrations, create a dedicated service user per integration. Do not reuse a human admin account. Human accounts change passwords, get suspended when staff leave, and make audit logs unreadable. A service user named svc-hr-sync or svc-reporting makes every log entry attributable and keeps capability grants minimal. Give it a real email address so account recovery works, and disable password-based web login — the account should never be used interactively.
Capability checks in Moodle are not always binary. core_user_get_users_by_field, for example, does not simply refuse calls from users without all listed capabilities — it filters which fields are returned based on what the caller can see. A service user with only moodle/user:viewdetails can call the function successfully but will receive fewer fields than a user with moodle/user:viewalldetails. Test with the minimal role first and add capabilities only when you observe missing data.
The role and capabilities
Create a dedicated role per integration. Start from "No role" or "Authenticated user" — not "Manager" — and grant only the capabilities the integration's functions require. A good starting point for discovering which capabilities a function needs is the auto-generated documentation at /admin/webservice/documentation.php on your own Moodle instance, filtered to your integration's external service. The listed capabilities are indicative — the actual runtime checks inside each function can be more granular and context-dependent, so treat the documentation page as a starting point and test with the real account under real conditions.
Assign the role at the system context for site-wide integrations. If any function needs to operate within a specific course or category, assign the role there as well. That is where most "works in dev, fails in production" bugs originate.
Tokens
The token ties everything together. It belongs to one user, is restricted to one external service, can be locked to a specific egress IP, and can be revoked at any time from the admin UI. Token metadata is stored in mdl_external_tokens, including iprestriction (comma-separated IPs or ranges), validuntil (Unix timestamp, 0 for no expiry), and lastaccess.
Treat tokens like credentials. Store them in a secret manager — Vault, AWS Secrets Manager, or your deployment environment's equivalent. Never put a token in a URL query string that hits a log. Even though the REST convention uses ?wstoken=..., pass it as a POST body parameter in systems that log full request URLs.
Set an expiry date when you create the token and plan for rotation from day one: create a new token before the old one expires, deploy it, verify it works, then revoke the old one. Moodle supports overlapping tokens for the same user and service, so rotation can be zero-downtime. Ninety days is a common rotation cadence in enterprise environments, though the right interval depends on your organization's security policy.
There are no native Moodle CLI scripts for token management. For scripted provisioning, the options are moosh webservice-install (creates user, role, capabilities, service, and token in a single command), a bootstrap script using Moodle's external_generate_token() API, or the HTTP endpoint at /login/token.php?username=USER&password=PASS&service=SHORTNAME for non-admin accounts — though this will fail silently if the site enforces multi-factor authentication via tool_mfa, since the script cannot handle an MFA challenge. On enterprise Moodle instances where MFA is mandatory, moosh or a bootstrap script is the only reliable programmatic path.
Enabling web services end to end
1. Enable web services globally
Site administration Advanced features Enable web services.
2. Enable the REST protocol
Site administration Server Web services Manage protocols. Enable REST.
3. Create the service user
Site administration Users Accounts Add a new user. Use a descriptive username like svc-hr-sync. Set a long random password — Moodle requires one, but the account will not log in interactively. Use a team inbox for the email address.
4. Create the dedicated role
Site administration Users Permissions Define roles Add a new role. Set the context types to System (add Course and Category if your functions need those). Grant only the capabilities the integration's functions require.
5. Assign the role
Site administration Users Permissions Assign user roles System context. Add the service user with the role you just created.
6. Create the external service
Site administration Server Web services External services Custom services Add. Name it after the integration, set Enabled to yes, and enable Authorized users only. Under Functions, add exactly the functions the integration will call — not a broad selection, just the specific ones. Under Authorized users, add the service user.
7. Create the token
Site administration Server Web services Manage tokens Add. Set the user, the service, an IP restriction if your caller has a stable egress IP, and a Valid until date. Copy the token to your secret store immediately — you cannot retrieve it again.
Smoke test
With the token in hand, confirm everything is wired correctly:
core_webservice_get_site_info requires no capabilities beyond a valid token and a working service. A response containing sitename and functions means the plumbing is working. If it fails, the JSON body will tell you why — web services not enabled, protocol not enabled, token invalid or expired, function not in the service, or the service user missing a capability.
The function catalog
Moodle has roughly 800 web service functions. Most integrations use twenty of them.
The authoritative reference for your instance is at /admin/webservice/documentation.php, filtered to your integration's external service. It shows each function's parameter schema, return schema, and required capabilities for your exact Moodle version — more reliable than any third-party list.
User lookups
core_user_get_users_by_field — exact-match lookups on a single indexed field: id, idnumber, username, or email. Accepts an array of values and returns matching user records. For broader filtering across multiple criteria, core_user_get_users accepts key/value pairs — but note that neither function supports filtering by timemodified, which has implications for delta sync covered in the next section.
User lifecycle
core_user_create_users and core_user_update_users handle provisioning and updates. For deprovisioning, prefer update_users with suspended = 1 over core_user_delete_users. Calling delete_users triggers Moodle's soft-delete routine: the row is kept, but the username is rewritten to a generated string and the email is replaced with an MD5 hash — destroying that data irreversibly. The original username and email are freed by the scramble and become available for reuse, but there is no way to recover what they were. Suspension is the safer option when you may need to reverse the action later.
Cohorts
core_cohort_get_cohorts, core_cohort_add_cohort_members, and core_cohort_delete_cohort_members cover cohort management. The separate core_cohort_get_cohort_members function returns all members for the given cohort IDs in a single response — it has no limitfrom or limitnum parameters. For large cohorts this produces a very large payload and can hit PHP memory limits. If that is a concern, fetching enrolled users per course with core_enrol_get_enrolled_users (which does support pagination) is often a better approach.
Enrolments
enrol_manual_enrol_users and enrol_manual_unenrol_users handle enrolment via the manual method, which must be enabled in each course. core_enrol_get_enrolled_users retrieves enrolled users with limitfrom and limitnum for pagination.
Courses and completion
core_course_get_courses_by_field and core_course_create_courses cover course lifecycle. The field lookup function accepts a sectionid parameter from Moodle 4.5 onward. core_completion_get_course_completion_status returns per-user course completion status.
Rate limiting and self-throttling
Moodle has no built-in rate limiting for web service callers. Your integration can saturate the application server during a bulk sync and block login requests for real users. All throttling must come from your side.
As a starting point for your own tuning: two concurrent connections per Moodle instance, 100–250 ms sleep between sequential calls, and a cap of 60–120 calls per minute depending on function cost. These are operational heuristics, not documented Moodle limits — adjust based on observed server load. Course search functions and anything that fans out across many users are expensive at the database layer.
If Moodle sits behind a reverse proxy you control, enforce a rate limit there as a second line of defense. An nginx example for the web services endpoint:
Beyond per-call throttling, implement a circuit breaker: track response times alongside error rates. When Moodle starts responding slowly — not just erroring — back off immediately. A Moodle under load often shows elevated response times for 30–60 seconds before it starts returning errors. If your integration waits for errors before backing off, the window of damage is already large.
A simple circuit breaker has three states: closed (normal operation), open (backing off, not calling Moodle), and half-open (a probe call to test recovery). Open the circuit when your error rate or response time exceeds a threshold over a rolling window. Move to half-open after a fixed backoff period. Resume normal operation only after a successful probe.
Sync architecture
The timemodified limitation
The most common mistake in Moodle integration design is using mdl_user.timemodified as a cursor for delta sync — "give me all users updated since timestamp X". The field is updated when core_user_update_users is called, but not when an auth plugin synchronizes the account, not when a user's enrolments or profile fields change, and not when an admin's SSO action updates related tables. For many real integration scenarios, timemodified misses a significant fraction of the changes you care about.
Making this worse: neither core_user_get_users_by_field nor core_user_get_users supports filtering by timemodified. If you want delta sync by timestamp, you need a custom web service function, a direct database query via a local plugin, or a different strategy entirely.
Maintaining sync state on your side
The most reliable approach is to maintain sync state in your own integration's database, not to query Moodle for what changed:
sync_records(
  external_id      VARCHAR  -- ID in the source system (HR, CRM, etc.)
  moodle_id        INT      -- mdl_user.id once known
  external_hash    VARCHAR  -- hash of the last synced payload
  synced_at        DATETIME
  sync_status      ENUM('ok', 'pending', 'error', 'conflict')
)
On each sync run, pull the current state from your source system. Compare each record's hash against the stored hash. Send only records where the hash changed. This is independent of Moodle's timemodified and survives the cases where Moodle's internal timestamps are not updated.
Bootstrap versus incremental
The first sync run is fundamentally different from subsequent ones. It may cover tens of thousands of records and take hours. Build a dedicated bootstrap path: process in batches of 100–500 records, committing your sync state after each batch so a failure mid-run is resumable; look up each record with core_user_get_users_by_field before deciding create or update; and log a start and end timestamp for the bootstrap run so you know exactly what was processed.
Once the bootstrap is complete, switch to incremental runs that only process records where the hash changed since the last successful sync.
Reconciliation
Even with a well-designed incremental sync, drift accumulates. Events are missed, errors go unretried, records are created in Moodle through another path. A nightly reconciliation run that does a full diff — source system vs. Moodle — catches everything the incremental path missed. It does not need to be fast; it runs when the site is quiet. What it produces is a list of discrepancies that the reconciliation logic then resolves, typically with the source system winning.
Concurrent write hazards
InnoDB locking and your own integration
Moodle does not use application-level locking for web service handlers. Two simultaneous calls to core_user_update_users for the same user serialize at the InnoDB row-lock level. One call waits; if the wait exceeds innodb_lock_wait_timeout (typically 50 seconds on a default MySQL install), you receive a dmlwriteexception. This is generally safe to retry — it was a timeout, not a logic error.
A dmlwriteexception is Moodle's catch-all for any database write failure. The underlying cause matters for retry decisions: a deadlock or lock timeout is transient and safe to retry with backoff; a unique constraint violation (duplicate username, duplicate email) is a logic error and should not be retried until the conflict is resolved. Parse the exception message to distinguish them before deciding what to do.
Collision with Moodle's own scheduled tasks
Moodle's HR Import plugin, scheduled tasks that manage enrolments or cohorts, and other background processes write to the same tables your integration writes to. They use Moodle's Lock API for application-level coordination with each other — but that lock does not extend to web service calls. The only contention between them and your integration is at the InnoDB level.
The practical consequence: if an HR Import run is bulk-updating thousands of users inside a transaction and your integration sends a write for one of those users, you will wait on the row lock. If the transaction is large and slow, you may timeout. Schedule integration sync runs so they do not overlap with known-expensive Moodle tasks, and treat dmlwriteexception with a lock-timeout message as a signal to back off and retry rather than immediately failing.
Running multiple instances of your integration
If your integration ever runs as multiple parallel processes — because of a deployment overlap, a manual rerun, or horizontal scaling — they will contend with each other. Add a distributed lock before starting a sync run. A simple file lock (flock) is enough on a single server. For multi-server deployments, use your database, Redis, or another shared lock source.
Error handling and recovery
Error response format
Moodle web service errors always arrive with HTTP 200 and a JSON body:
The debuginfo field is only present when $CFG->debug is set to NORMAL or higher. On production Moodle instances with debugging disabled, debuginfo is absent. Your error logging must handle both formats and record message (always present) as the primary human-readable error string.
Retry taxonomy
Not every error should be retried. Getting this wrong creates self-inflicted load spikes.
HTTP 502/503/504 from the web server, dmlwriteexception with a deadlock or timeout message, and connection timeouts are transient. Retry with exponential backoff.
invalidparameter, schema mismatch errors, and dmlwriteexception with a constraint violation message are client faults. Do not retry. Log the full error, alert, and pause until the issue is diagnosed.
invalidtoken, accessexception, and requiredcapability mean authorization has broken. Stop the run immediately. Do not retry any further calls until the authorization problem is resolved. These errors during a batch sync should page an operator — continuing the run just accumulates failures and masks the actual problem.
Business-logic errors like usernametaken and emailalreadyexists are conflicts, not failures. Surface them to the source system, record them in your sync state, and move on to the next record.
Exponential backoff with jitter
When retrying transient errors, use exponential backoff with added jitter to avoid thundering-herd effects when multiple processes back off simultaneously:
import random, time

def retry_with_backoff(fn, max_attempts=5, base_delay=1.0, max_delay=60.0):
    for attempt in range(max_attempts):
        try:
            return fn()
        except TransientError as e:
            if attempt == max_attempts - 1:
                raise
            delay = min(base_delay * (2 ** attempt), max_delay)
            jitter = random.uniform(0, delay * 0.2)
            time.sleep(delay + jitter)
Cap the total number of retry attempts. After the cap, write the record to a dead-letter store — a database table or queue — for manual review or a later automated retry pass. Do not discard failures silently.
Authorization failures mid-batch
If an accessexception or invalidtoken arrives partway through a long sync run, stop immediately. Do not log it as a single-record error and continue — every subsequent call will fail the same way, producing hundreds of identical errors unnecessarily. Abort the run, record which records were processed and which were not in your sync state, and alert. The run can resume cleanly once the authorization issue is fixed.
Audit logging
Moodle's internal logging records that web service calls occurred but omits what you need for operational visibility: request parameters, response outcome, call duration, and the caller's IP as seen from your integration.
Log per call: function name, parameters (redacted where sensitive), response outcome, duration, and HTTP status. Log per sync run: records in, records out, records skipped, records errored, and total duration. Log the last-used timestamp per token as a cross-check for misuse.
In regulated environments, your logs combined with Moodle's internal logs typically satisfy auditors. Without them, you cannot reconstruct what your integration did six months ago when someone asks.
Monitoring
Moodle has a Check API (available via admin/cli/checks.php on the command line, and surfaced in various admin report pages) that covers cron health, failed tasks, and configuration problems. Moodle core does not ship an unauthenticated HTTP health check endpoint. The Catalyst IT tool_heartbeat plugin fills that gap: it adds a lightweight HTTP probe that returns 200 when the site is healthy and 503 when it is not, compatible with Nagios, Icinga, and load balancer health checks.
For integration-specific monitoring, track these signals:
Use core_webservice_get_site_info as a heartbeat probe. Run it every few minutes from your integration host; a failure or timeout indicates a network or Moodle availability problem before your next real sync run hits it.
Track error rates by category (transient, client fault, authorization, business) over a rolling window. Transient errors up to 5–10% in a single run are typically noise on a busy site. Sustained transient errors above that threshold, or any authorization error, should alert immediately.
Track sync run duration and records-per-minute. A run that takes twice as long as usual is worth investigating even if no errors appear — Moodle under database load often shows elevated response times long before it starts returning errors.
Alert on: any invalidtoken or accessexception; any sync run that fails to complete within a defined time budget; transient error rate sustained above threshold; token age within 30 days of expiry. Do not alert on individual transient errors that resolve in the next attempt, or on usernametaken/emailalreadyexists conflicts.
Poll versus event-driven
Most integrations start as a polling cron job and later need event-driven updates. Planning for both from the start is cheaper than retrofitting.
Polling works well when data volume is low to medium, latency of minutes to hours is acceptable, and Moodle is the target system rather than the source of change events. Common traps: the timemodified limitation described above means polling Moodle for "what changed" is unreliable for most record types; the first sync run is far larger than subsequent ones and needs its own path; overlapping runs need a lock.
When you need near-real-time updates, or when Moodle needs to push changes to an external system, an event observer plugin is the right tool. Keep it thin — its only job is to detect the event and enqueue a task. A minimal observer in a local plugin:
namespace local_pluginname;

class observer {
    public static function user_updated(\core\event\user_updated $event): void {
        $task = new \local_pluginname\task\sync_user();
        $task->set_custom_data(['userid' => $event->objectid]);
        \core\task\manager::queue_adhoc_task($task, true);
    }
}
Setting internal to false in db/events.php ensures the observer does not fire inside an open database transaction — if it did, a task queued inside an uncommitted transaction may be lost when the transaction rolls back. The second argument to queue_adhoc_task deduplicates by custom data, preventing the same user from accumulating dozens of identical tasks under rapid edits.
The actual HTTP delivery belongs in the ad-hoc task class, not the observer. Doing I/O synchronously in an observer adds latency to Moodle's own request cycle.
In practice, most production integrations end up hybrid: event-driven for high-value changes like user deactivation, enrolment, and completion, with a nightly reconciliation run that catches anything the event path missed.
Version compatibility
Moodle's web service API is generally stable between minor versions. Between major versions, check for deprecations.
Moodle 4.5 LTS receives security fixes until late 2027 (36 months from its October 2024 release) and is the safe baseline for customers on a long-term support track. Functions deprecated in 4.5 will not be finally removed until 6.0 under the current deprecation policy — a more stable window than earlier major-version transitions. Moodle 5.0 removed functions deprecated before 4.5 (MDL-84036). Moodle 5.1 introduced a /public/ directory structure: the web server document root moves on disk, but endpoint URLs that integrations call remain unchanged.
If your integration uses module-level functions for quiz, assign, or forum, test against both 4.5 and 5.1 separately. The core user, cohort, enrolment, course, and completion functions covered in this guide have no confirmed deprecations or removals between 4.5 and 5.1 as of this writing.
For your integration's test suite: contract tests against a live Moodle instance per supported major version, smoke tests on every deployment, and a regression set covering your most-used functions running nightly. The Moodle team publishes Docker images for CI use. Track the functions you call on the Moodle Tracker and subscribe to release notes — a deprecated function typically has two major versions before removal.
Common pitfalls
Service account auto-enrolled as teacher in courses it creates
If your integration creates courses via core_course_create_courses and the service account shows up as an enrolled teacher in those courses, the cause is almost always a role assigned at system or category context that carries teacher-level capabilities. The account inherits that role into every course under the context, which is why it appears as teacher everywhere — not just in courses it created.
The fix is to review the role assignment at the system or category level and tighten it to the capabilities the integration actually needs, such as moodle/course:create and any others the integration genuinely uses.
One setting worth ruling out separately: “Creators’ role in new courses” under Site administration > Users > Permissions > User policies. Based on the Moodle 4.5 source, this setting fires in the UI course creation path (course/edit.php) and in the course request approval path, but not in the web service function core_course_create_courses. So it is unlikely to be the cause for a pure API integration. It still matters if the same account also creates courses through the UI, or if the site uses course requests.
Where integrations grow beyond their original scope
A few integration shapes reliably consume more time than their initial estimate suggests.
Multi-site or federated Moodle is one. Capability and identity management across instances is not simply doing the same thing twice — token scope, role context, and user identity handling all compound.
Writing to module submissions from outside is another. The web services for mod_assign and mod_quiz were designed for the mobile app, not for external systems. External writes to submissions frequently require workarounds that break when Moodle updates its internal module logic.
Reporting dashboards built directly on web service calls do not scale. At volume you need a read replica or a data warehouse export, not another polling loop against core_course_* and core_completion_*.
Custom profile field synchronization is a slow-burn problem. Profile field metadata drifts between environments and between Moodle versions. It needs to be treated as schema, not just data, with explicit version management from day one.
If any of those describe what you are building, sort out the architecture before you sort out the code. If you want a second pair of eyes on a Moodle integration, get in touch.
When a Moodle scheduled task crashes mid-run, the lock it held can persist indefinitely, blocking every subsequent run. This guide explains how Moodle's task locking works, how to identify a stuck task, and how to clear it without disrupting active tasks.
How Moodle task locking
works
Every scheduled task and ad-hoc task acquires a lock before it runs.
By default Moodle uses a file-based lock factory: it creates a lock file
inside moodledata/lock/ named after the task. While the
lock file exists, no other process can start the same task.
When a task finishes normally it removes the lock file. When it
crashes — OOM kill, PHP fatal, server restart — the lock file stays. The
next scheduled run finds the lock taken and either waits until a timeout
or skips the task entirely. This repeats on every subsequent run. From
the admin panel everything looks normal: the task is enabled and appears
in the list. It just never runs.
Identifying the stuck task
The scheduled task log is the first place to check:
Site administration > Server > Tasks > Scheduled task log
Filter by the task name and look for a run that started but has no
matching completion entry, or check the last run time — if it is hours
older than the configured schedule, the task is likely locked.
From the database:
SELECT classname, lastruntime, nextruntime, timestarted
FROM mdl_task_scheduled
WHERE timestarted > 0
ORDER BY timestarted DESC;
For ad-hoc tasks (queued jobs from enrolments, messaging, etc.):
SELECT classname, timestarted, timecreated, faildelay
FROM mdl_task_adhoc
WHERE timestarted > 0
ORDER BY timestarted;
A row with a timestarted value and no corresponding
completion means the task is either still running or was abandoned
mid-run. Cross-check against running PHP processes:
ps aux | grep php
If there is no matching process for the task, the lock is stale.
Finding the lock file
Lock files live in $CFG->dataroot/lock/. The
filenames are derived from the task class name. For example, the lock
for \core\task\send_new_user_passwords_task will be a file
in the lock/ directory with a name based on that class.
ls -la /var/moodledata/lock/
Files older than your expected task duration with no matching running
process are safe to remove.
Clearing a stale lock
For a file-based lock, removing the file is sufficient:
rm /var/moodledata/lock/task_<lockname>
If your installation uses a database lock factory
($CFG->lock_factory = '\core\lock\db_record_lock_factory'),
locks are stored in mdl_lock_db:
SELECT * FROM mdl_lock_db;

DELETE FROM mdl_lock_db WHERE resourcekey LIKE '%classname%';
After clearing the lock, trigger the task manually to confirm it
runs:
Some tasks — H5P content sync, Turnitin submission checks, large
report generation — can run for several minutes and hold a lock for the
entire duration. When they share a cron invocation with fast tasks, a
slow run blocks or delays everything that follows.
Run heavy tasks on their own dedicated CLI invocation, separate from
the general cron:
# In a separate cron entry:
php /var/www/moodle/admin/cli/scheduled_task.php \
  --execute='\mod_turnitintooltwo\task\submission_scores_sync'
This keeps the general cron moving and gives you independent control
over the frequency and timeout of the heavy task.
Persistent ad-hoc task
backlogs
Ad-hoc tasks that repeatedly fail accumulate a faildelay
value and are retried with increasing backoff. A large backlog combined
with a lock issue can cause the queue to grow faster than it drains.
Check the queue depth:
SELECT classname, COUNT(*) AS queued, MAX(faildelay) AS max_delay
FROM mdl_task_adhoc
GROUP BY classname
ORDER BY queued DESC;
Tasks with a high faildelay and a large count are
candidates for investigation. If the failure is environmental (a
third-party API that was down, a missing file), clearing
faildelay and resetting timestarted lets them
retry immediately:
UPDATE mdl_task_adhoc
SET faildelay = 0, timestarted = 0
WHERE classname = '\mod_assign\task\cron_task'
AND faildelay > 0;
Only do this once you have resolved the underlying cause.
When running a multilingual Moodle site with SAML2 single sign-on via the auth_saml2 plugin, you may need the login button label to appear in different languages based on the user’s interface language. Two approaches that look like they should work, do not:
Putting <span class="multilang" lang="en">...</span> tags into the “IdP label override” setting has no effect. The multilang filter only runs on content rendered through Moodle’s format_text() or format_string(). The auth_saml2 plugin passes the label directly from the database to the template without a filter pass.
Using the Language customization tool (Site administration > Language > Language customization) to override auth_saml2 language strings will not help for a custom label either. That tool only modifies strings defined in language files, not values stored as admin settings in the database.
The root cause: auth_saml2 stores the IdP label as a plain string in mdl_config_plugins and renders it via {{name}} in the login form template with no language awareness.
The correct approach: theme template override
The reliable solution is to override core/loginform.mustache in your Moodle theme and replace the dynamic {{name}} rendering with Moodle language strings defined in the theme.
Moodle’s {{#str}} Mustache helper always resolves against the current user’s interface language. By moving the label from a database-stored admin setting into theme language files, you get full multilang support through the standard Moodle mechanism.
Prerequisites
Template overrides must live inside a theme — there is no other mechanism in Moodle for overriding Mustache templates. If you are not already on a custom theme, create a minimal child theme before proceeding. Editing a third-party theme directly will get overwritten on the next theme update.
Drop the theme directory into theme/ and visit the Moodle notifications page to register it. You do not need to activate it as the default theme yet — do that once the template override is in place.
Step 1: Override the login form template
Copy lib/templates/core/loginform.mustache from Moodle core into your theme at:
theme/yourtheme/templates/core/loginform.mustache
If your parent theme already overrides this template, copy from the parent theme instead of from core, so you preserve its customizations.
In the template, find the block that renders identity providers. The default Moodle core template renders the button label as:
For multi-IdP setups where each provider needs a distinct translated label, the loop approach breaks down because there is no per-provider identifier in the template context. In that case, bypass the generic loop and hard-code one button per provider, each pointing to a known URL and using a dedicated string key. This makes the template more tightly coupled to a specific IdP configuration, but gives you full label control per provider.
Step 2: Add language files
Create a language file for each language your site supports:
Each file defines the same string keys with translated values.
lang/en/theme_yourtheme.php:
<?php
defined('MOODLE_INTERNAL') || die();
$string['saml_login_label'] = 'Log in with your organization account';
lang/nl/theme_yourtheme.php:
<?php
defined('MOODLE_INTERNAL') || die();
$string['saml_login_label'] = 'Inloggen met uw organisatieaccount';
Moodle will automatically use the file matching the user’s current interface language. If no file exists for the user’s language, Moodle falls back to English.
Step 3: Purge caches
After deploying your changes, purge Moodle’s theme and template caches: Site administration > Development > Purge all caches.
Caveats
This approach fully decouples the login button label from the auth_saml2 admin setting. Once you override the template, the “IdP label override” field in the plugin settings has no effect on sites using your theme. You own the label entirely from the theme side.
If you later reconfigure auth_saml2 (add a new IdP, change metadata), you will need to update the template and lang files manually to match. This is a minor maintenance trade-off for a clean, built-in multilang solution.
Moodle cron fails silently more often than you'd expect. This guide explains how to detect those failures reliably using an external heartbeat monitor, and walks through the code that implements it as a Moodle plugin.
Why Moodle’s
built-in cron status is not enough
Moodle shows a “Last cron run” timestamp in Site
administration > Server > Tasks > Scheduled tasks.
That value is written when a cron run starts, not when it
finishes. A run that hits a PHP fatal error, exhausts available
memory, or gets stuck on a locked task still updates the timestamp
before it stops.
The result: the admin panel shows a recent timestamp, everything
looks normal, but no tasks have completed for hours.
The dead man’s switch pattern
An external cron monitor works as a dead man’s switch:
At the end of a successful cron run, your server sends a signal — a
simple HTTP GET request — to a URL that the monitoring service
provides.
The service expects to receive that signal on a schedule you
define.
If the signal does not arrive within the expected window, the
service sends an alert.
The monitoring service has no access to your server. It only waits
for the ping.
Why a scheduled
Moodle task doesn’t work here
The obvious approach would be to add a scheduled task that runs last
and fires the ping. Moodle doesn’t support that. There is no “cron
finished” event, and you cannot configure a task to run after all
others.
More fundamentally: if cron is broken, a scheduled task inside that
cron cannot reliably fire. You need the monitor to live outside of
Moodle’s task scheduler.
The approach: a wrapper
script
The solution is to replace the direct cron invocation with a
pipe:
The 2>&1 merges stderr into stdout so that PHP
errors are captured alongside normal output. The wrapper script receives
everything on stdin, inspects it, and fires the appropriate ping.
The key check
Moodle’s cron script writes one predictable string when it completes
successfully:
Cron script completed correctly
The wrapper reads stdin and looks for that string:
If the string is absent — because cron crashed, was killed, or timed
out — the failure branch runs: it fires the failure ping and emails the
full cron log to the configured recipients.
Sending the ping
The ping itself is a GET request to a configurable URL. Inside a
Moodle CLI script you have the full Moodle stack available, so you can
use Moodle’s own curl class:
require_once($CFG->libdir . '/filelib.php');

$curl = new curl();
$curl->get($url);
Having the URL configurable from within Moodle admin — rather than
hardcoded in a shell script — means an administrator can change the
monitoring endpoint without touching the server.
Storing the URL as a Moodle
setting
A single admin settings page handles all configuration. The success
and failure URLs are stored as plugin config values:
$settings->add(new admin_setting_configtext(
    'tool_heartbeat/cron_monitor_success_url',
    new lang_string('cron_monitor_success_url', 'tool_heartbeat'),
    new lang_string('cron_monitor_success_url_desc', 'tool_heartbeat'),
    '',
    PARAM_URL
;
You configure a monitor on any dead man’s switch service that accepts
HTTP pings. Set the expected interval to match your cron schedule and
add a grace period long enough to cover normal load variation. When
pings stop arriving, the service sends an alert through whatever channel
you choose — email, SMS, webhook.
Edge cases
OOM kills: If PHP is terminated by the operating
system before producing output, the pipe closes without the success
string. The monitoring service will not receive a ping within the
expected window and will alert. The email log in this case will be empty
or partial — check dmesg for OOM killer entries.
Parallel cron runs: The wrapper applies only to the
CLI invocation managed by the system cron job. If you run multiple
parallel cron processes or use a cron daemon, each invocation needs its
own pipe.
Reading stdin:
file_get_contents('php://stdin') works in most setups, but
on some systems the stream is not immediately available. A fallback
using fopen and fgets is worth adding for
robustness:
We implemented this as a Moodle admin tool plugin
(tool_heartbeat), compatible with Moodle 3.9 and later. It
includes the wrapper CLI script, all admin settings, optional email
notifications with the full cron log on failure, and a master on/off
toggle. Contact Solin if you want to use
it directly.
Moodle's AMD modules load JavaScript asynchronously and isolate dependencies using RequireJS. This guide covers module structure, injecting Moodle services, localization, and building production-ready minified output using Grunt.
SOP: Writing and Building AMD Modules in Moodle
This guide will walk you through creating, localizing, and building asynchronous module definition (AMD) JavaScript modules in Moodle, as well as how to pull in core Moodle services (like the notification system) from your AMD code.
1. What is AMD in Moodle?
Moodle uses RequireJS to load JavaScript modules asynchronously. An AMD module is a JavaScript file that:
Declares its dependencies via a define([...], function(...) { … }) call.
Exports one or more functions (often a single init entry point).
Can be minified and concatenated into production-ready code.
By using AMD, modules only load when needed and avoid polluting the global namespace.
2. Folder Layout
Inside your plugin (e.g. mod/assessmentform/), you should have:
mod/assessmentform/
├── amd/
│   ├── src/             ← Your unbuilt source files
│   │   └── survey_init.js
│   └── build/           ← Moodle’s build step will place minified files here
│       └── survey_init.min.js
└── view.php             ← Calls your AMD module via js_call_amd()
amd/src/Place your human-readable modules here.
amd/build/After running the build, minified code will live here. Commit the build outputs so your plugin works without requiring Node on the production server.
core/strOffers str.get_string(key, component) for on-the-fly translations.
js_call_amd() in PHPPass an associative array of arguments from PHP into your JS entry-point.
4. Injecting Moodle Services
Just list them in your dependency array:
define([
    'jquery',
    'core/notification',
    'core/str',
    'core/ajax',
    // …your other libraries…
], function($, notification, str, Ajax) {
    // You now have `notification`, `str` and `Ajax.call()` available.
});
Moodle provides a Grunt setup out of the box. At your plugin root:
Install tools (one-time per project):
npm install --global grunt-clinpm install
Build all AMD modules (including yours):
grunt amd
This reads every amd/src/*.js in all plugins, minifies them, and writes to amd/build/*.min.js.
You can also target just your plugin:
grunt amd:mod_assessmentform
Commit the contents of amd/build/ into your plugin’s repository.
If you prefer a standalone build, you can drop a Gruntfile.js at your plugin root that only references your AMD folder. Moodle’s core Gruntfile already handles this; there’s no extra setup needed.
7. Summary Checklist
Create amd/src/yourmodule.js with a define([...], ...).
Build with npm install && grunt amd and commit amd/build/*.min.js.
Test on your dev site, then deploy.
With this workflow in place, you can rapidly iterate your JS in amd/src/ and then generate production-ready, minified AMD modules via Moodle’s standard Grunt toolchain.
Monitoring a Moodle web server requires both datacenter-level alerting and application-specific checks. This guide covers configuring your hosting provider's monitoring tools, adding site-specific metrics, and tracking trends over time.
Goal of Monitoring
The goal of monitoring is to ensure that the system, i.e. the web server and all software on it, is working properly and within established parameters. If at any time a website or a subsystem on the web server stops functioning, a signal should be sent out to the sysop, who maintains the system.
In addition, it should also be possible to examine trends over time, or historic data, to evaluate whether or not the system’s resources should be expanded (or scaled back) in the future.
You will notice that we are relying on two monitoring systems now: one provided by the data center, and a monitoring system based on Webmin, which is an administrative system for (web) servers. The reason for adding Webmin’s monitoring is that the data center does not allow you to monitor specific websites, but Webmin does.
1. Check Monitoring Settings of the Data Center
The data center may have its own monitoring that comes pre-installed and configured with a new web server (VPS). Just make sure that everything is set up correctly.
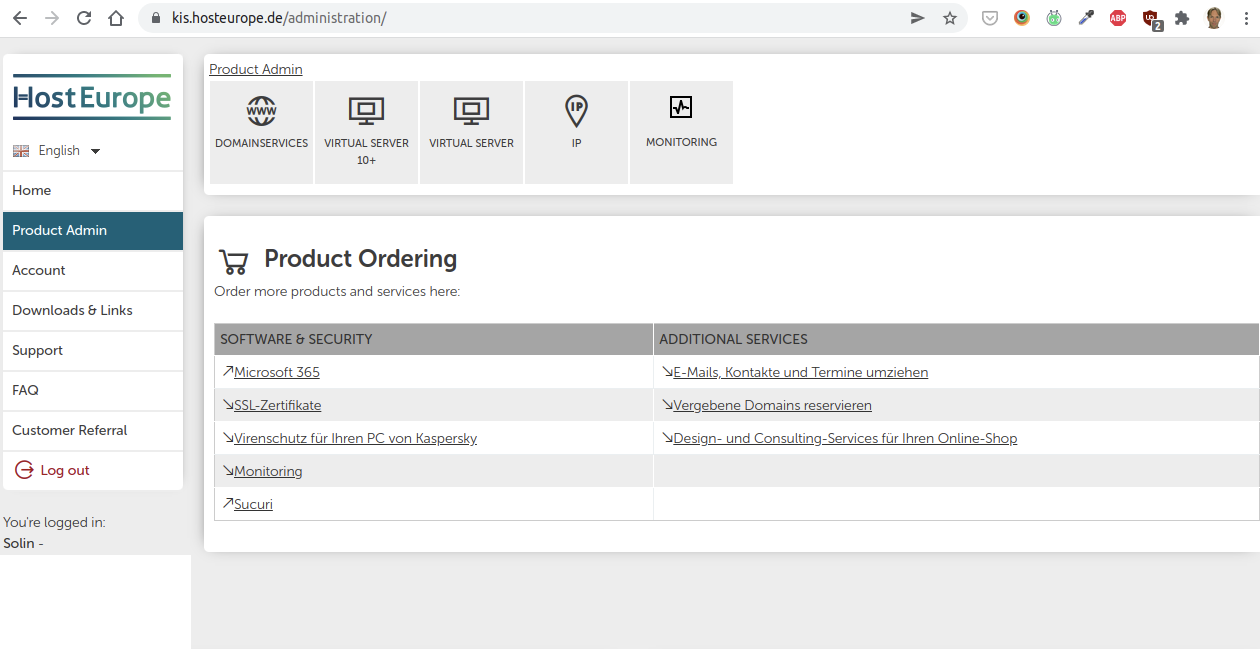
For instance, for HostEurope, do the following. Sign in to HostEurope’s KIS website: https://kis.hosting-provider.de/ and click on the appropriate type of server: either Virtual Server 10+ or Virtual Server. In this guide we show the first type.
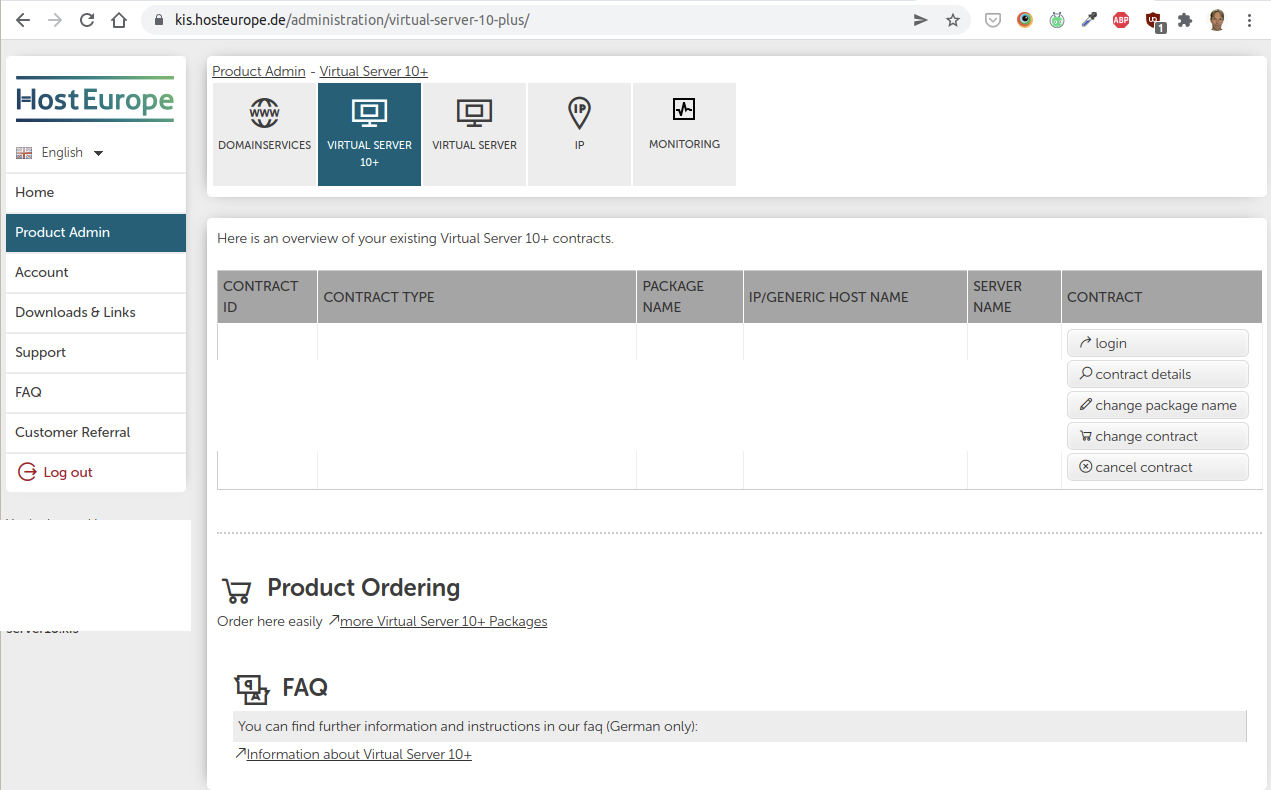
In the following screen, click on the login button, under the Contract column:
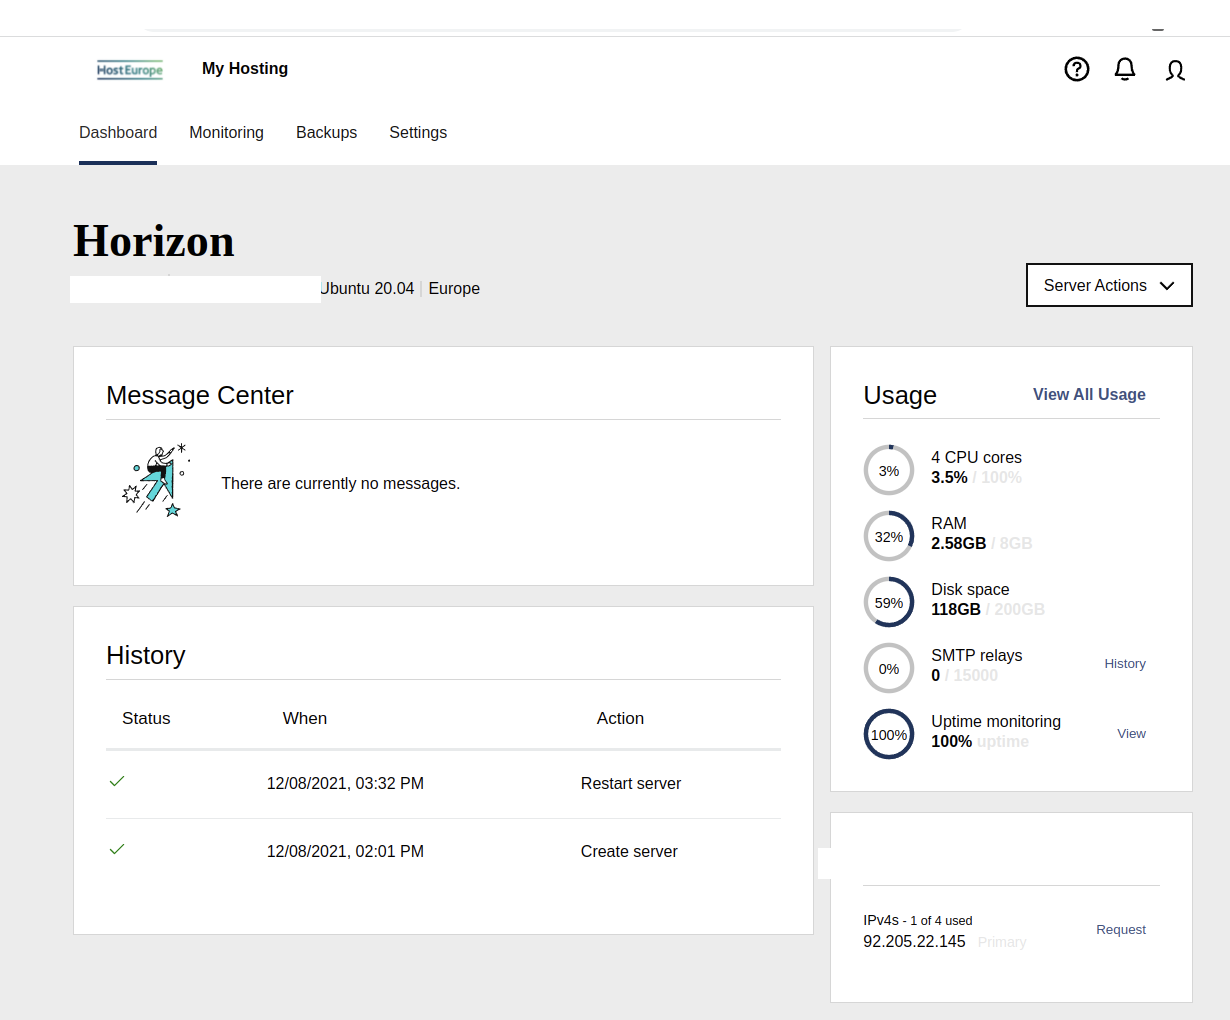
This will open a new browser window (or tab). Here you see the current usage:
The following metrics should not exceed 80%:
CPU cores
RAM
And Disk space should not exceed 95%.
If the system is not used to send out email, then the SMTP relays metric is typically 0.
Ideally, Uptime monitoring is 100%, but may decrease slightly to 99.91% over time.
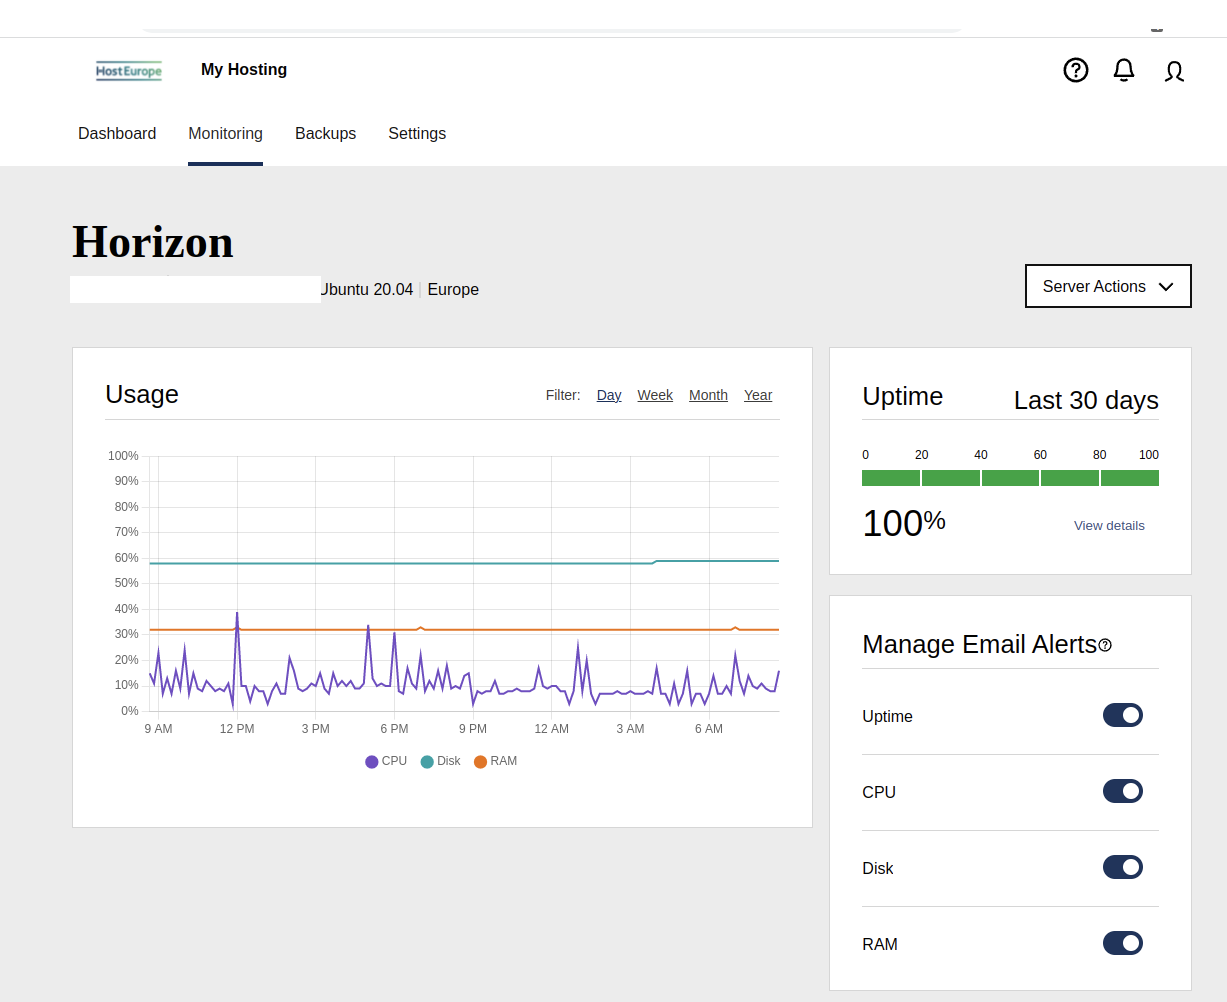
Now click on the Monitoring tab, which should take you to the next screen:
Here, make sure all the settings for Manage Email Alerts are switched on.
This monitor will send out an email to the owner of the KIS account with an alert if either CPU, Disk or RAM usage exceeds 80%.
External Monitoring
It is also recommended to add an external monitor. An external monitor is a monitor that resides on another system. For instance, you can use cronitor.io for free to perform a GET request every five minutes to a website on the server you want to monitor. Don’t forget to add your email address so you will receive notifications when the monitor fails.
Using an external monitor ensures you get alerted if the server goes down even if the entire data center goes down with it.
Heartbeat Monitor
We have a custom plugin, tool_heartbeat, which can be used to send out an “I’m alive” signal to cronitor.io (or a comparable service). Use this tool to make sure Moodle’s (or Totara’s) cron is still working.
Here's how it works:
The Moodle or Totara site stops telling Cronitor "I'm alive!" for whatever reason. (The Heartbeat plugin does this, hence the name.)
Cronitor notices Totara is no longer alive, waits 5 minutes just in case, and then sends out an alert "Type: Alert" ("Event not received on schedule").
If (when) Totara is reanimated, Cronitor sends out an alert "Type: Recovery".
So, in the email messages from Cronitor, "Alert" means there's a problem, and "Recovery" means it's fixed.
Installation and configuration
Place the contents of this directory inside the /admin/tool/heartbeat folder relative to your Moodle or Totara install path.
Configure the cron job to * * * * * php /path_to_your_moodle/admin/cli/cron.php | php /path_to_your_moodle/admin/tool/heartbeat/cli/cron.php > /dev/null
Plugins settings
Cron monitor: Enable the monitor and add the url of the external cron monitor service
Email settings: Enable the email notifications, add the email subject and body, select recipients that get the email.
2. Make sure Webmin is Installed
Our standard procedure is to install Webmin, an administrative system for web servers. So Webmin should be installed and accessible, typically through the hostname and the 10000 port, e.g.: https://vps2.example.internal:10000/.
If it is not installed, please see the installing a new Moodle website.
3. Configure Webmin to Monitor Critical Systems and Websites
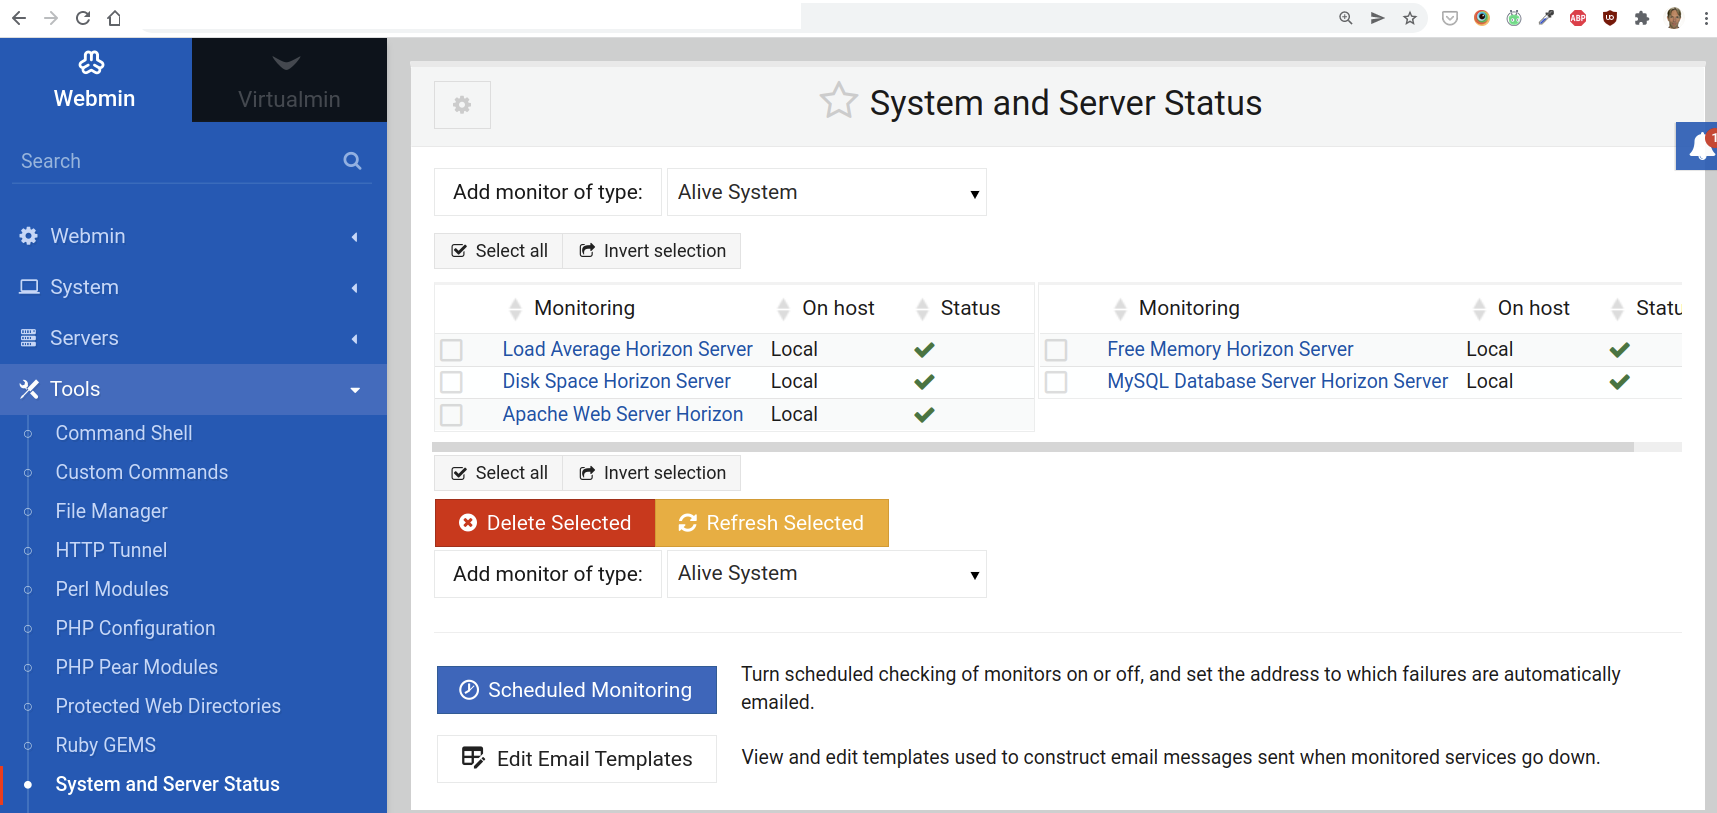
Go to Webmin and open the Tools >System and Server Status section:
We need to add five types of monitors:
Load average: what is the average usage of the system in during the last 15 minutes
Disk space: how much is left on the disk (typically an SSD drive)
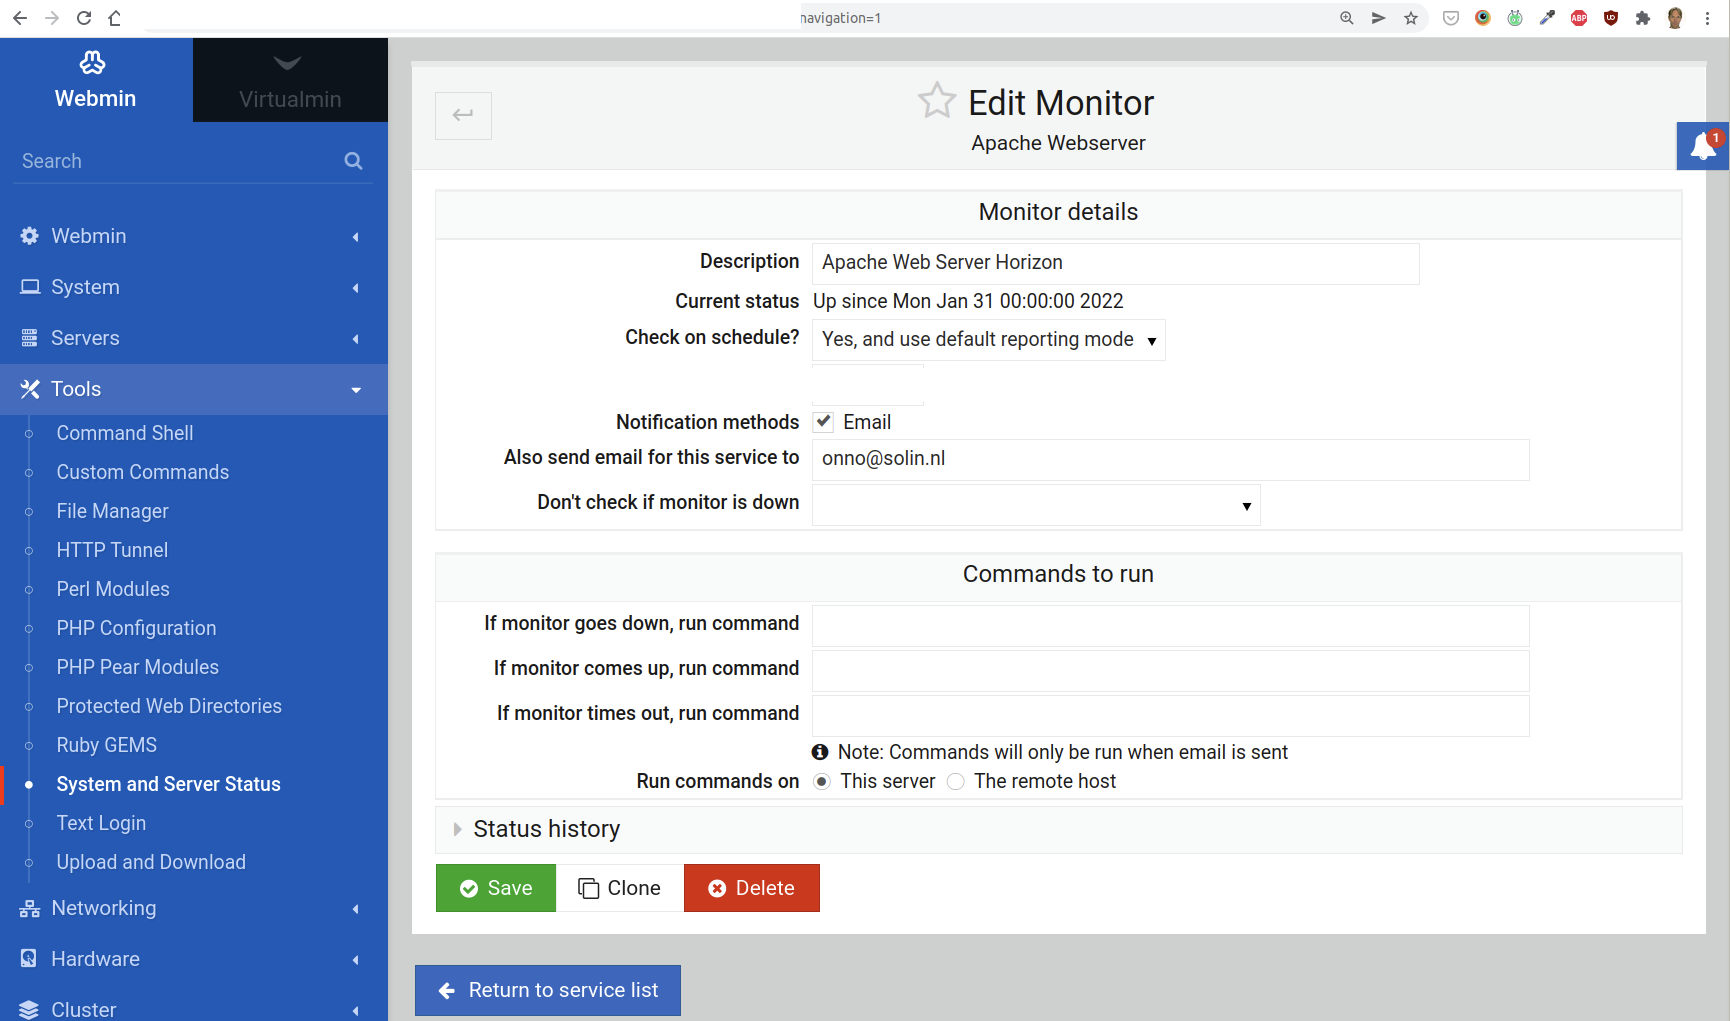
Apache web server: is the web server up and running?
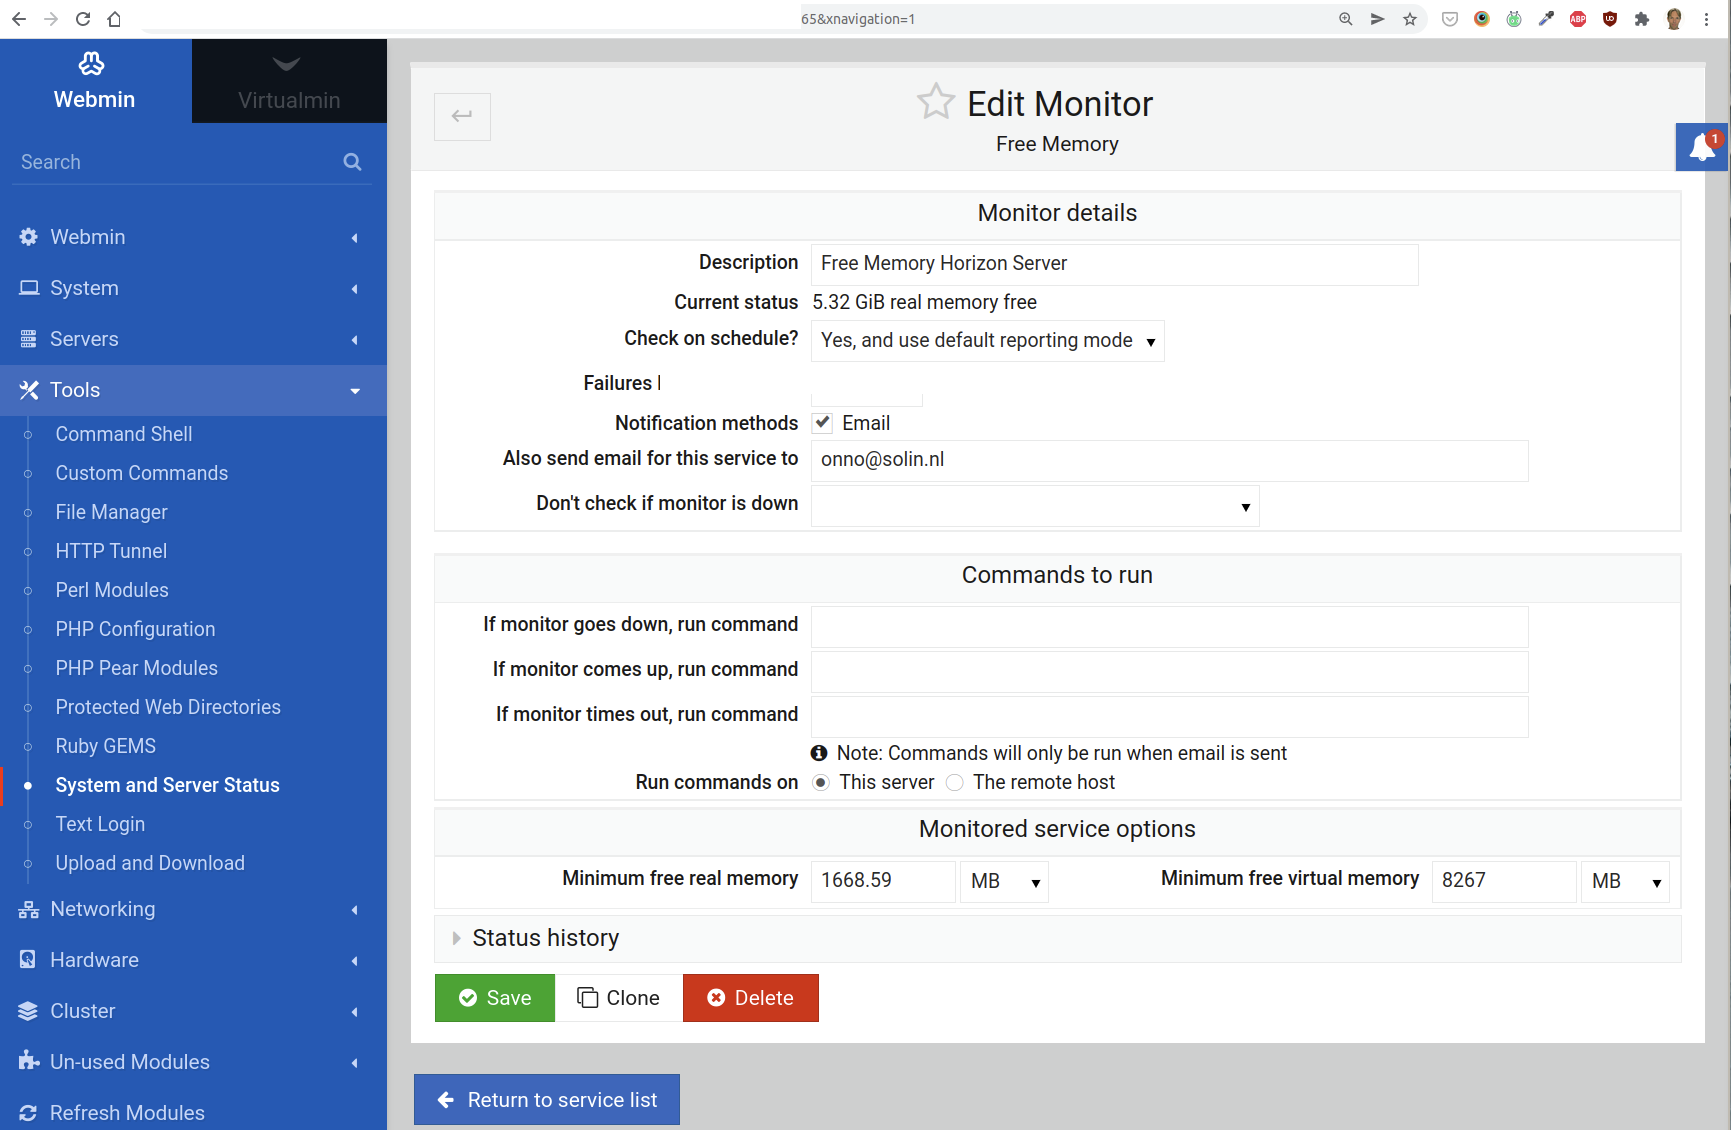
Free memory: how much free memory do we have left?
MySQL database server: is the database server up and running?
To add a new monitor in Webmin, use the select box next to the button Add monitor of type and then click the button.
Settings for All New Monitors
For all new monitors, do not forget to add a Description that includes your users’s name (or main website), and fill out the field “Also send email for this service to” with the address of the person in the sysop role for this server. Set the field “Failures before reporting” to 1. (See the screenshots below for some examples of where to find these fields.)
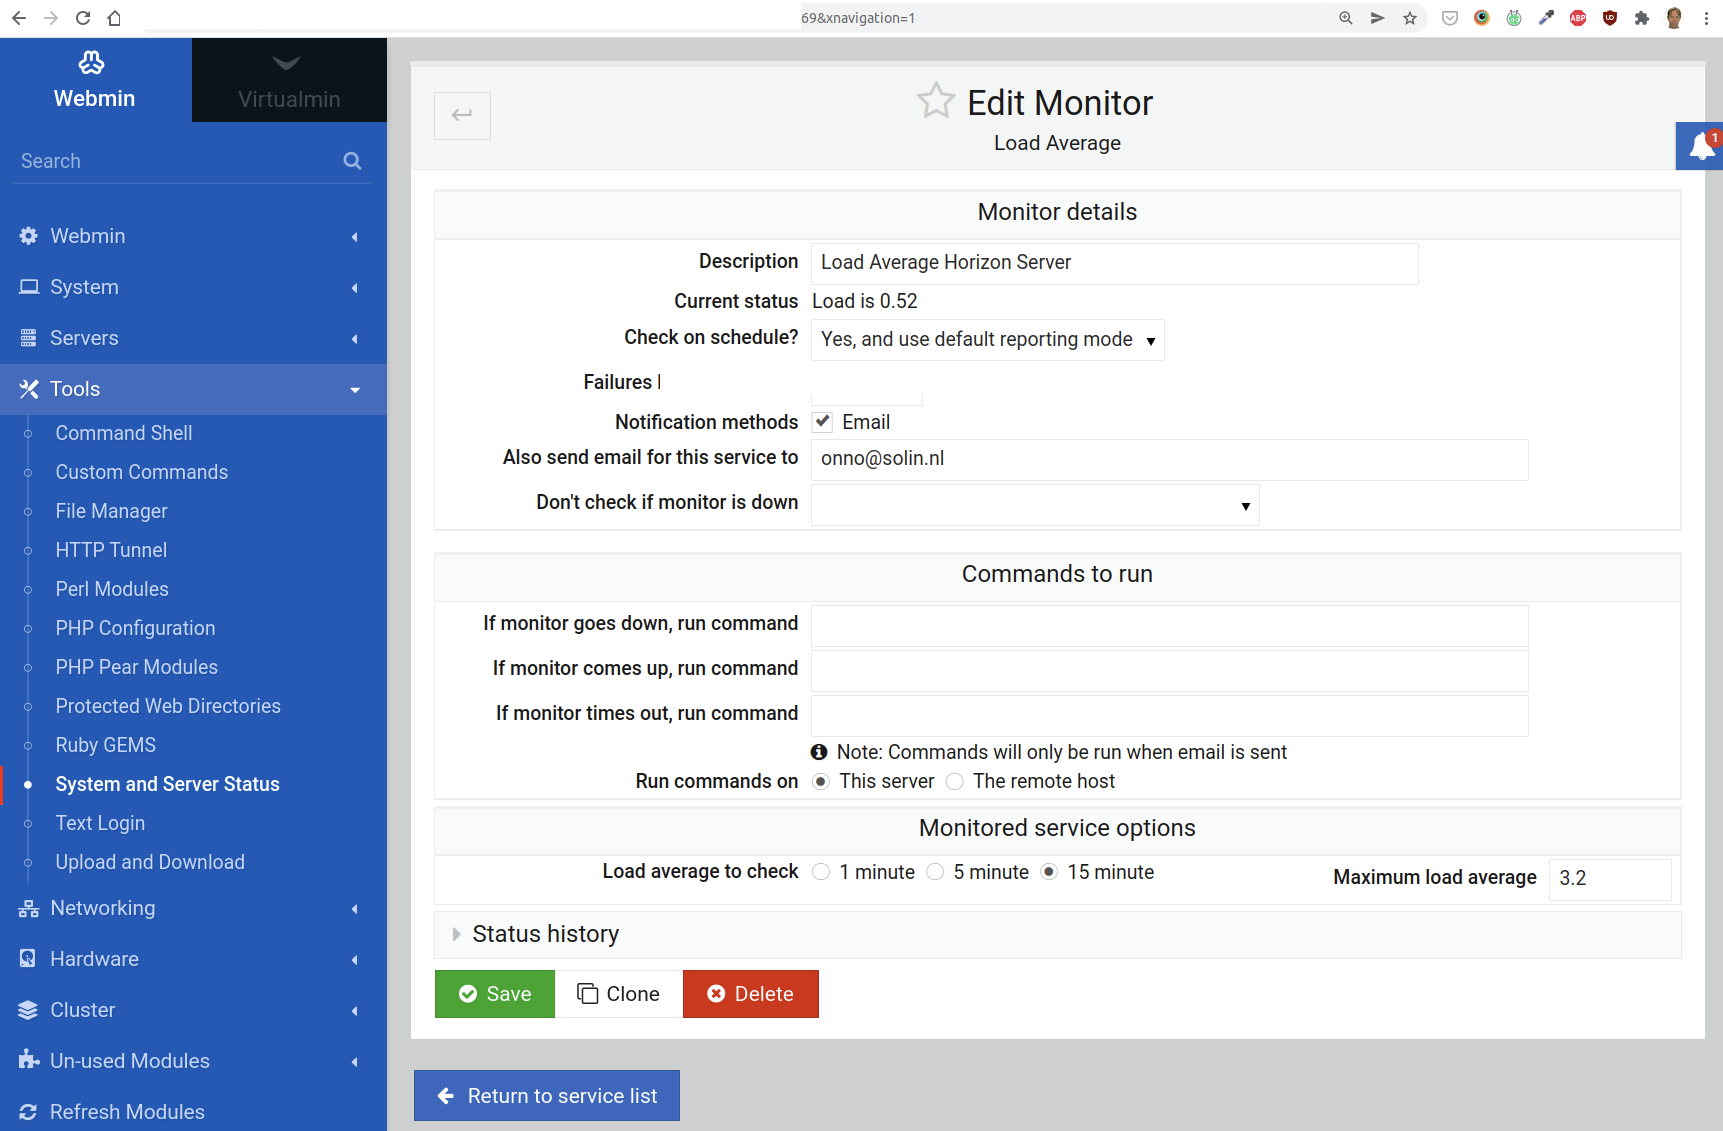
Load Average Monitor
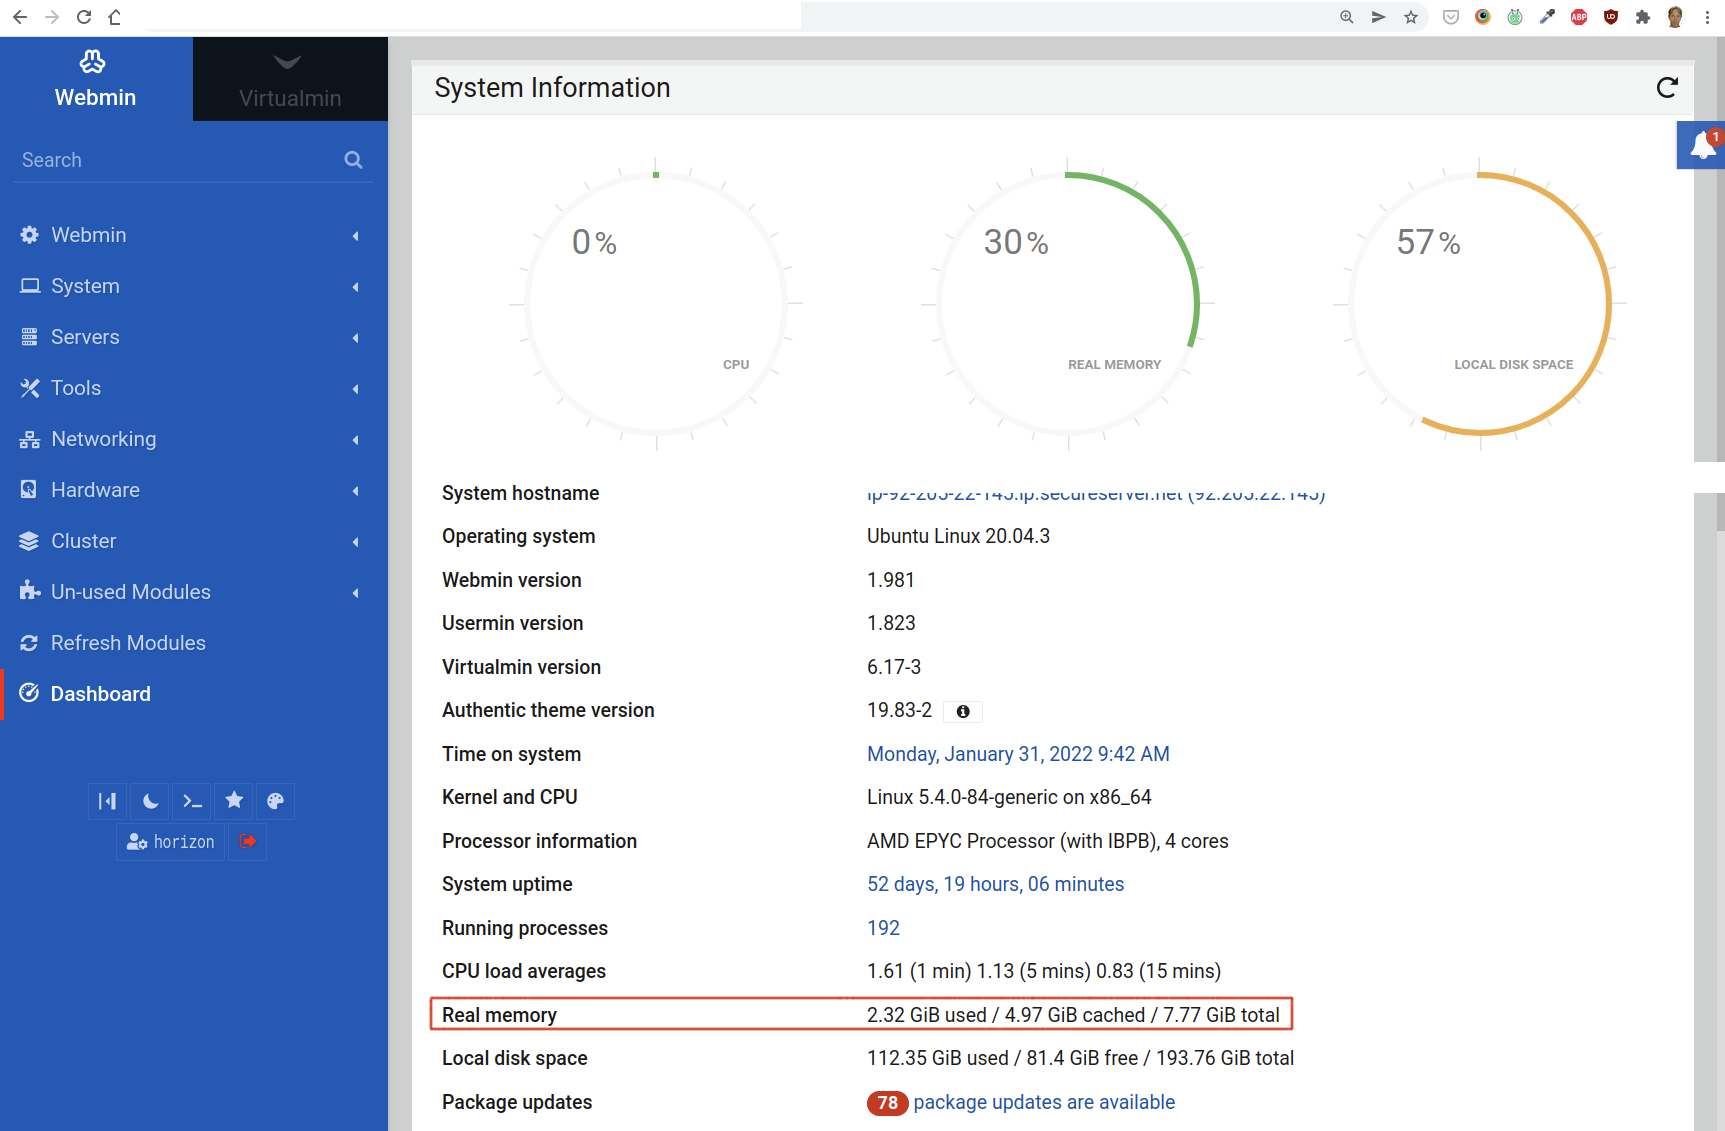
The average load is the usage of the system (mainly CPU usage) during the past 5, 10 and 15 minutes. To get a good perspective, we set this monitor to 15 minutes, under Load average to check.
The Maximum load average value is critical: it should not exceed 80%. The actual value to fill in, is based on the number of CPU cores. This is the computation:
n cores x .8
For instance, 1 core is 0.8, and 4 cores gives you a value of 3.2.
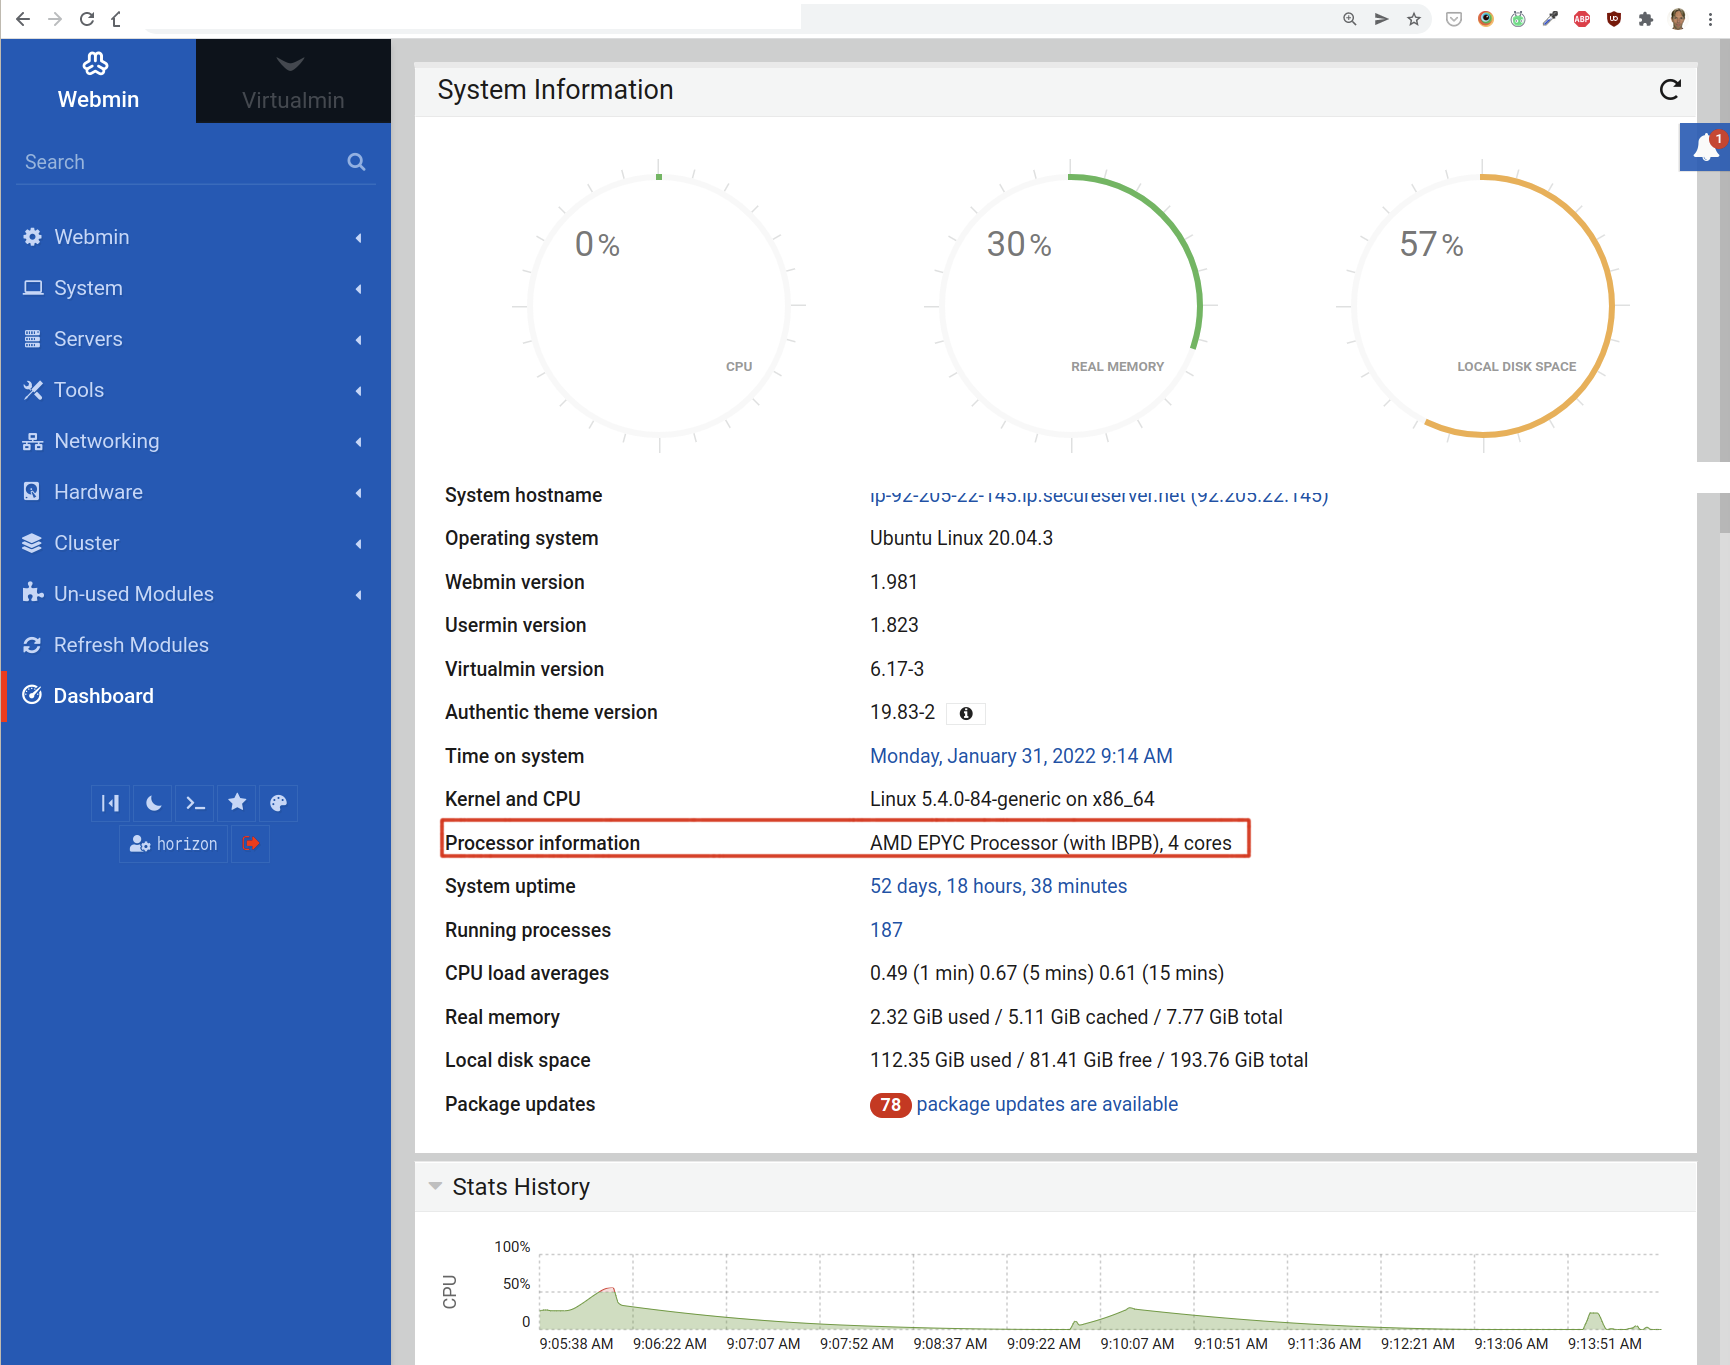
The number of cores can be retrieved from Webmin as well. Simply go to Webmin’s homepage and look for Processor information. There you find the number of cores:
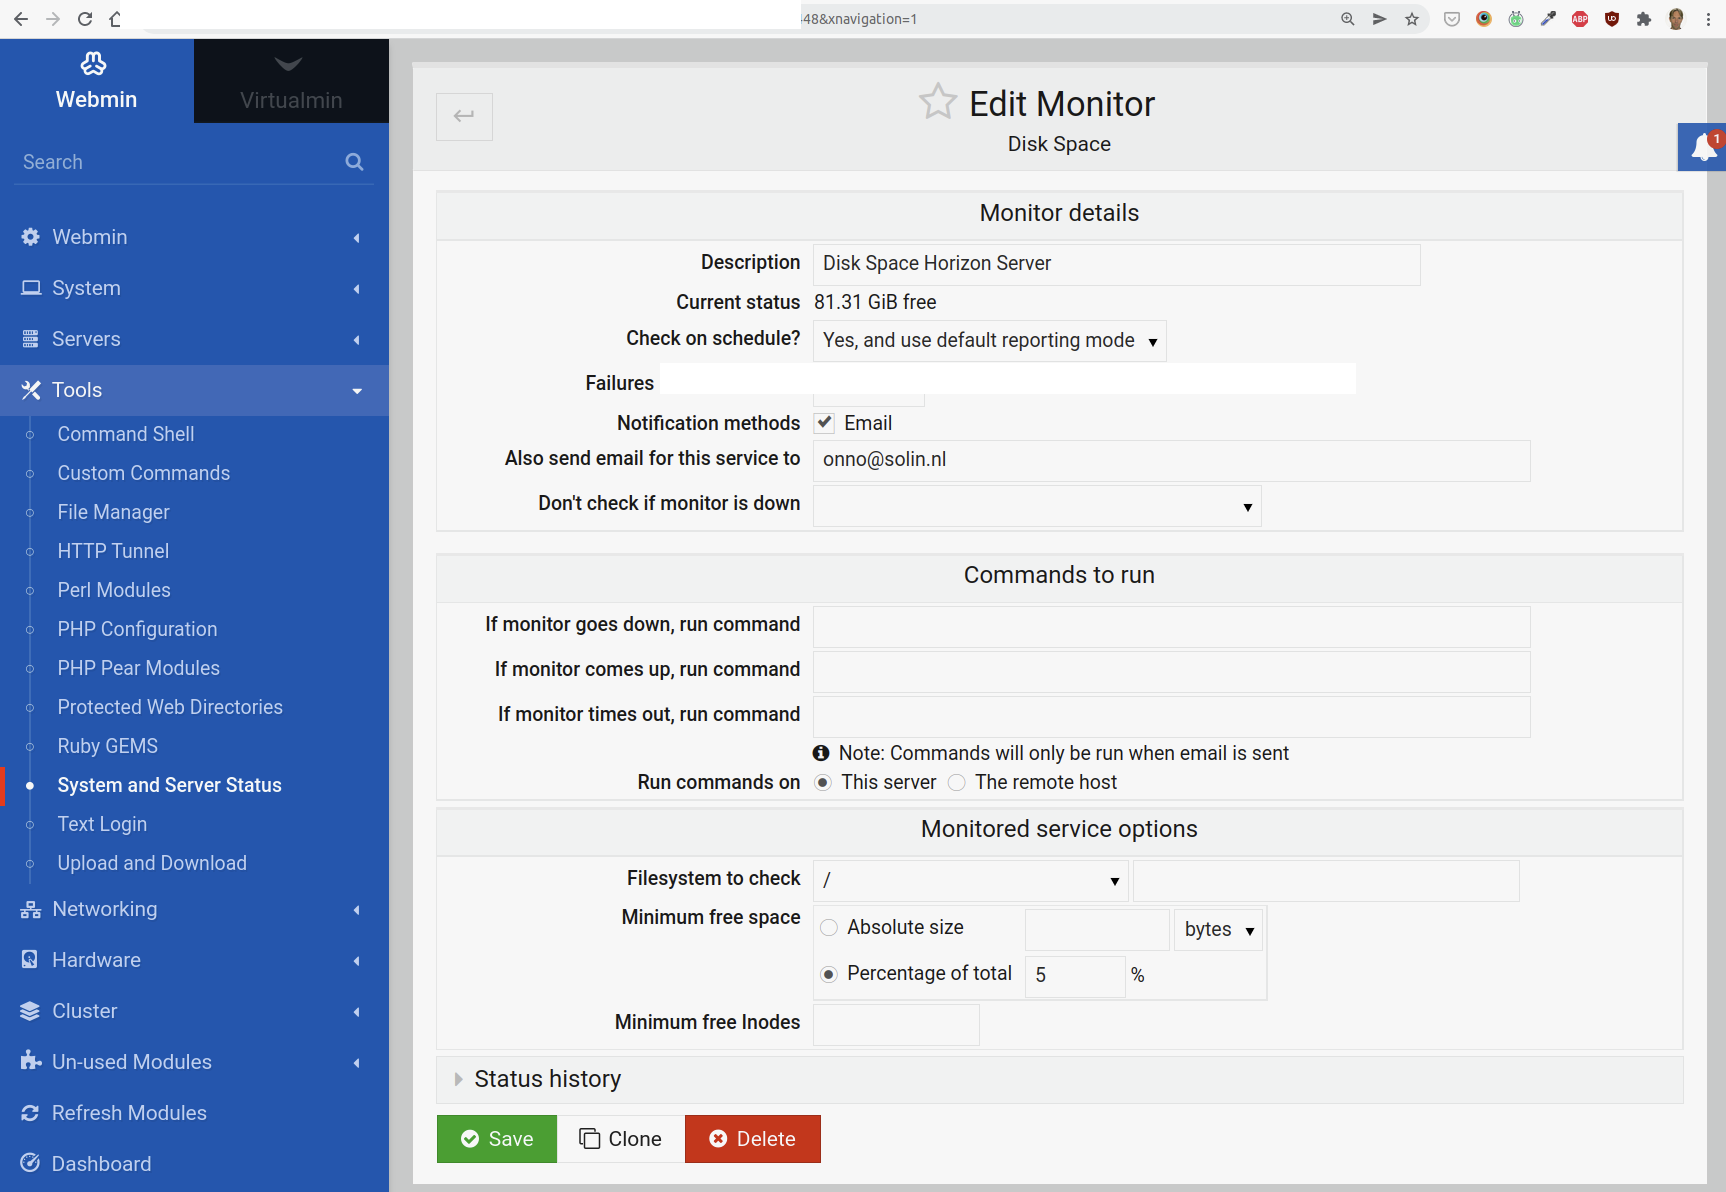
This is pretty straightforward: just fill in 5%. This should send out an alert if the disk is over 95% capacity. Filesystem to check is /.
Apache Web Server Monitor
The defaults for this monitor should be fine.
Free Memory Monitor
For this monitor, two values are critical:
Minimum free real memory: we want 20% to be free (or max 80% used)
Minimum free virtual memory: we want this set equal to the amount of physical RAM.
To compute the 20% minimum free RAM, we need to know the total available real memory. You can find this on the “homepage” of Webmin:
Webmin reports the total memory in Gigibytes (GiB). But the Free Memory monitor uses megabytes (MB). To convert the free memory from GiB to MB, use the following formula:
MB = 1073.74 x n GiB
For instance, if we have 7.77 GiB that gives us 8342.9598 MB. Of this number, we take 20% to fill in for the minimum free real memory, and 25% of the virtual memory as the “Minimum free virtual memory”.
MySQL Database Server Monitor
The defaults for this monitor are fine. Make sure that the “Failures before reporting” field is set to 1 and that the “Also send email for this service to” field is filled in.
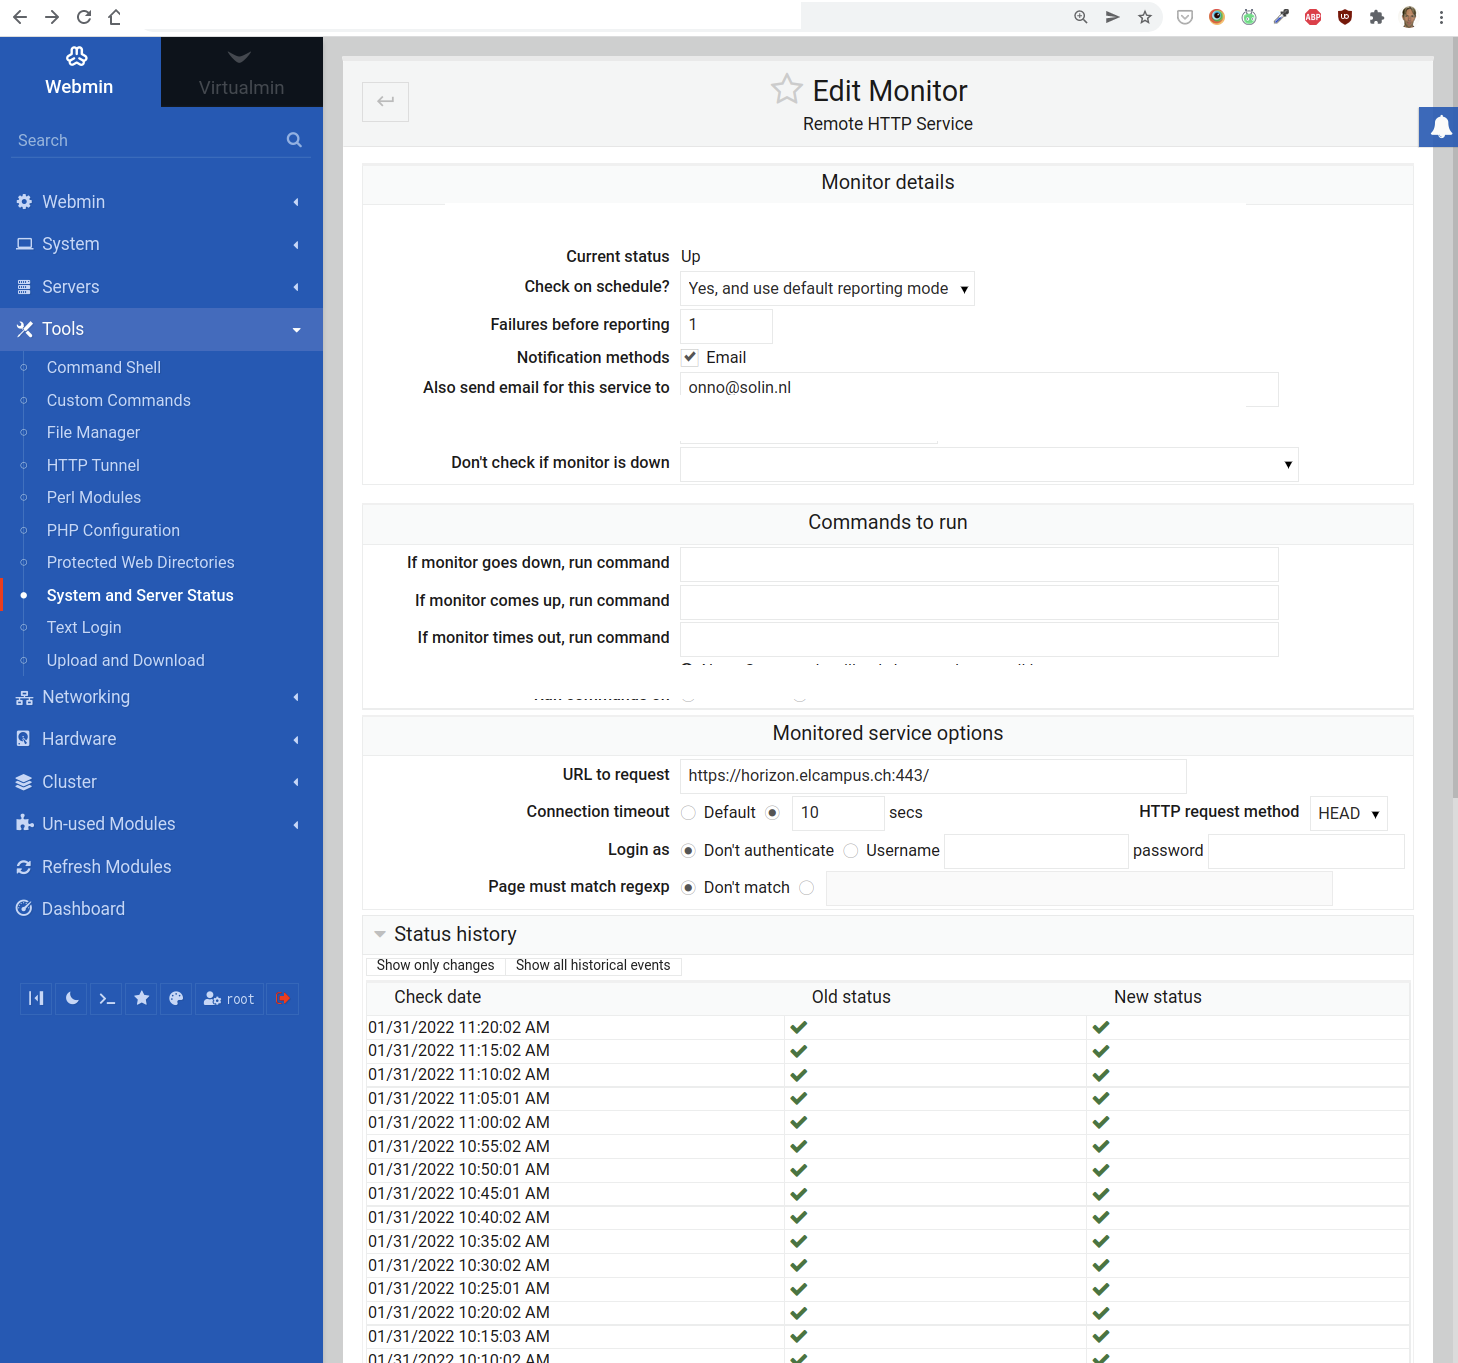
4. Add a “Remote HTTP Service” Monitor to Another Webmin
What happens if the entire web server is out or can no longer be reached? In that case, all the monitors we added in the section above will no longer run, or if they are still running, their email alerts may not reach you.
To counter this, we add a “Remote HTTP Service” monitor to a Webmin installation on another web server entirely:
As you can tell from the Status history, this check is performed every 5 minutes.
Set the field “Connection timeout” to 10 seconds. This should also notify you if the loading times for the Moodle website get unacceptable (i.e. more than 10 seconds).
5. Test the Monitoring
Testing should only be done on a completely new system that is not in use yet. The monitors are typically working – they consist of proven, well tested software. So we will not be testing that the monitoring software works, but mainly that we have configured it correctly.
The most critical monitor is the one for the actual Moodle website. We test this by simply turning off the web server. This can be done in Webmin.
Go to Servers > Apache and click the stop button, but only on a new system that is not in use yet:
If you have configured the Remote HTTP Service monitor correctly, you should receive an email very soon.
Restart the Apache web server by clicking on the play button.
You can also stop and start Apache on the command line:
If you do not receive any email, make sure that you have used the correct email address, and the correct url (including the port: nowadays almost always 443).
6. Install a New Munin Node on the Web Server
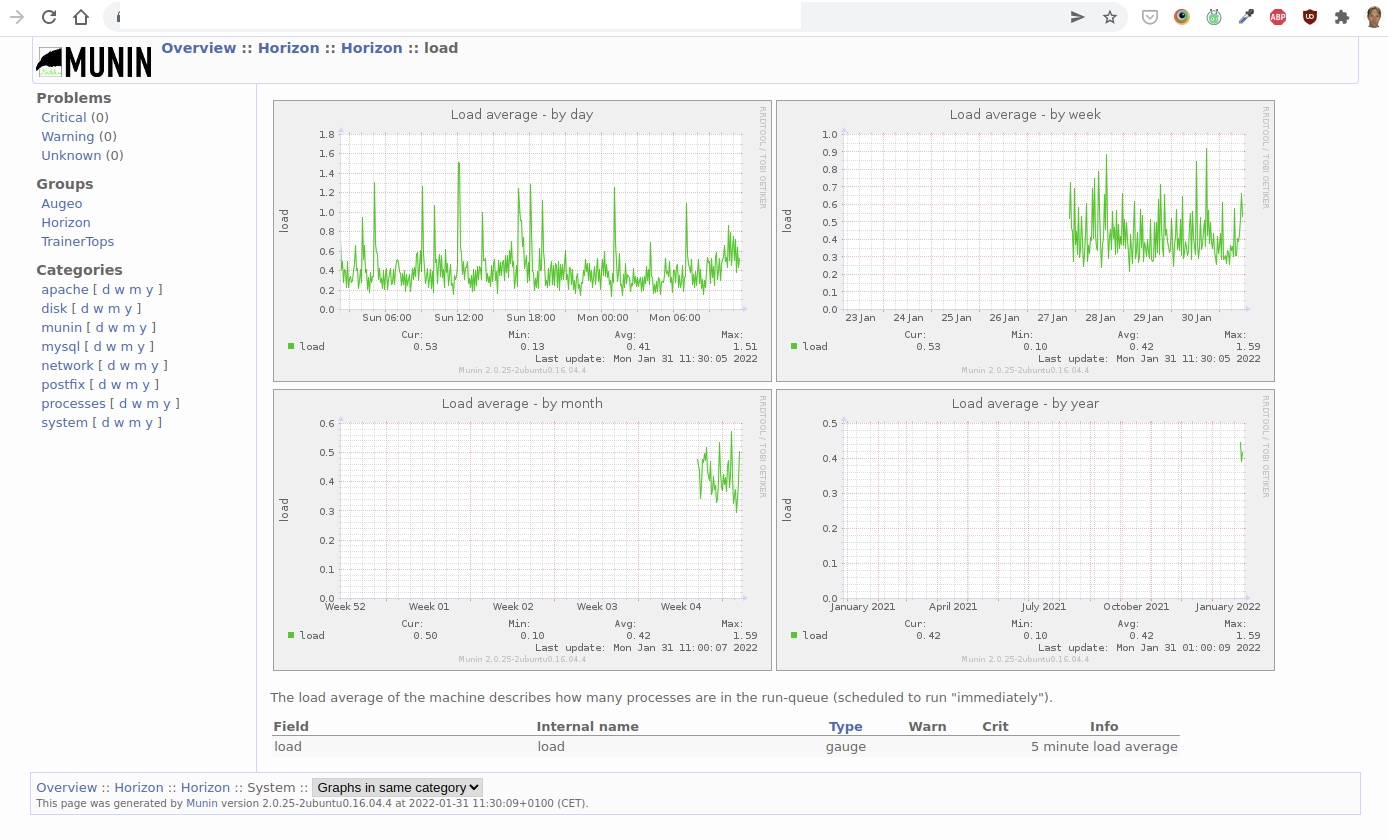
Munin is a logging tool which consists of a server and a node. The node is installed on the system that you want to monitor. The server is where you login to view the historical data. We already have the server in place.
If you login to monitoring.example.internal, you will see an overview of the systems that we are currently monitoring through Munin. Click on a specific system to view the details. Here is an example of the history of the load average:
To install the node on a new web server:
Make sure that the library libparse-http-useragent-perl is installed, e.g.:
sudo apt-get install libparse-http-useragent-perl
Install munin:
apt-get install munin
apt-get install munin-node
Make sure that the Apache’s server-status module is enabled. (You can do this through Webmin.)
Add the ip address of the Munin server (i.e. the “master”) to /etc/munin/munin-node.conf:
allow ^xxx\.xxx\.xxx\.xxx$
Configure the munin plugins.
Configuring The Munin Plugins
The default plugins for the node (so, on your Munin “client” web server) are in /usr/share/munin/plugins/. They appear in your munin website if they're symlinked in /etc/munin/plugins. For instance:
In /etc/munin/plugins, add symlinks to the apache plugins:
You must also configure them in the file /etc/munin/plugin-conf.d/munin-node. In that file, if you want to configure multiple plugins at once, use an asterisk notation. E.g.:
[apache*]
This addresses all apache plugins, which are by default:
apache_accesses
apache_processes
apache_volume
Usually when you look at the source code of the plugins (they're mostly perl scripts), you will find configuration instructions. For instance, the apache plugins need access to Apache's server status, so you have to configure Apache (i.e. httpd.conf):
<Location /server-status>
    SetHandler server-status
    Order deny,allow
    Deny from all
    Allow from 127.0.0.1
</Location>
ExtendedStatus on
We should also mention here that some plugins seem to exclude each other. For instance, the apache_average_time_last_n_requests plugin (not installed by default) seems to exclude the other (default) apache plugins.
Finally, restart the node:
/etc/init.d/munin-node restart
And open the firewall for port 4949.
Please note: if any of the Munin plugins fail, you will not see any date from that Munin node on the server (monitoring.example.internal)!
Configure The Munin Server
Finally, you also have to tell the Munin server to start polling the newly added node. Add the ip address of the node server to the file /etc/munin/munin.conf:
[ArbitraryServerName] # Apparently, you can't use spaces in this name
    address xxx.xxx.xxx.xxx
    use_node_name yes
The Munin server (the 'master') will read the new values within 5 minutes (the default polling interval).
Detailed Monitoring
If you run into any trouble with a VPS, you can add more detailed monitoring.
Performance Monitoring
The following is a monitoring script based on an email exchange with Hosting Provider, May 19th 2022 about the website outages on their VS10 Linux VPS (search for 198.51.100.43 #HE-DE:2ad1f7b4109530473 in the email history).
date >> /var/log/custom-monitoring.log; top -n 1 -b >> /var/log/custom-monitoring.log; lsof -ni >> /var/log/custom-monitoring.log
This log will contain detailed performance information which you can use to identify which particular application is causing high load, for instance.
Explanation:
date: current date and time
top: display linux processes;
-n 1: Specifies the maximum number of iterations, or frames, top should produce before ending.
-b: Starts top in Batch mode, which could be useful for sending output from top to other programs or to a file. In this mode, top will not accept input and runs until the iterations limit you've set with the `-n' command-line option or until killed.
lsof: lists on its standard output file information about files opened by processes
-i: selects the listing of files any of whose Internet address matches the address specified in i. If no address is specified, this option selects the listing of all Internet and x.25 (HP-UX) network files.
-n: selects the listing of files any of whose Internet address matches the address specified in i. If no address is specified, this option selects the listing of all Internet and x.25 (HP-UX) network files.
Log File Rotation
This type of monitoring generates a lot of data, so put it in log file rotation, see Webmin > System > Log File Rotation (the one for /var/log/letsencrypt/*.log is a good example).
Use the default settings, except for:
Rotation schedule: Daily
Number of old logs to keep: 31, so you will always have at least a month's worth of data.
Compress old log files?: Yes.
Slow Query Monitoring for MySQL
MySQL has a slow query log which records all queries which took longer than 10 seconds (by default) to execute. For Moodle, 10 seconds is not realistic because many queries take longer than that, so 30 seconds is probably better.
To activate slow query logging:
Login using the mysql client: sudo mysql -uroot -p
set global slow_query_log = 'ON';
set global slow_query_log_file ='/var/log/mysql/slow-query.log';
set global long_query_time = 30;
Confirm the changes are active by re-entering the MySQL shell (this reloads the system variables) and running the following command: show variables like '%slow%';
Make sure the slow-query.log is in log rotation (see subsection Log File Rotation).
Incident Response
If you receive an alert from either monitoring system, take the following steps:
Verify the alert
If normal usage was impeded, i.e. there was an actual outage, notify your users, with an estimated time to fix if possible
Fix the issue
Take steps to prevent this from happening again (and document them in a relevant SOP)
If there was an outage, notify your users that the issue is now fixed and what you have done, or will do in the very short term, to prevent a recurrence of the incident.
Appendix – Health Monitoring on Servers Without Webmin
Purpose
This section describes how basic server health monitoring is implemented on systems where Webmin is not installed or not permitted.
Instead of relying on a web-based administration interface, monitoring is achieved using:
a lightweight Bash script
systemd timers
standard Unix tooling (mail, logrotate)
This approach minimizes attack surface, avoids additional services, and is fully auditable.
Rationale (Why No Webmin)
Webmin provides convenient monitoring and administration features but:
introduces an additional web-facing service
increases maintenance and patching requirements
is not always allowed under security policies
For these reasons, this server uses a script-based monitoring approach that:
requires no open ports
has no daemon processes
depends only on standard OS components
provides clear alerting and diagnostics
Monitoring Scope
The health check verifies the following:
Disk usage on the root filesystem (/)
System load (1-minute average, normalized per CPU core)
Available memory (MemAvailable)
Required services:
apache2
postgresql
Local HTTP availability via http://127.0.0.1/
On failure:
a diagnostics snapshot is appended to a log file
an alert email is sent
On success:
a single “OK” line is written to the log
no email is sent
Installation
Prerequisites
Ensure mail utilities are installed:
apt update
apt install mailutils
Postfix is already present on this system.
Script Installation
Create the monitoring script:
vim /usr/local/sbin/healthcheck.sh
Insert the full script source provided below.
Set permissions:
chmod 0755 /usr/local/sbin/healthcheck.sh
Create the state directory:
mkdir -p /var/lib/healthcheck
systemd Configuration
Create the service unit:
vim /etc/systemd/system/healthcheck.service

[Unit]
Description=Basic server health check

[Service]
Type=oneshot
ExecStart=/usr/local/sbin/healthcheck.sh
Create the timer unit:
vim /etc/systemd/system/healthcheck.timer

[Unit]
Description=Run healthcheck every 5 minutes

[Timer]
OnBootSec=2min
OnUnitActiveSec=5min
AccuracySec=30s

[Install]
WantedBy=timers.target
To prevent alert emails from being classified as spam or overlooked:
Create a mail filter or rule in the mail client:
Match subject containing:[ALERT][Totara][ubuntu]
Always deliver to inbox (or mark as important)
Optionally apply a label such as “Server Monitoring”
This ensures alerts remain visible while avoiding unnecessary inbox noise.
Script Source Code
/usr/local/sbin/healthcheck.sh
#!/usr/bin/env bash

set -euo pipefail

HOSTNAME_SHORT="$(hostname -s)"
HOSTNAME_FQDN="$(hostname -f 2>/dev/null || hostname)"
NOW="$(date -Is)"

# -----------------------------
# CONFIG (defaults, overridable via environment)
# -----------------------------
: "${ALERT_EMAIL:=onno@solin.co Lee@teaching4business.com nikki@teaching4business.com}"
: "${MAIL_FROM:=monitoring@solin.co}"

: "${DISK_MAX_PCT:=95}"
: "${LOAD_PER_CORE_MAX:=1.50}"
: "${MEM_AVAIL_MIN_MB:=512}"

: "${HTTP_URL:=http://127.0.0.1/}"

: "${ALERT_COOLDOWN_SECONDS:=1800}"
: "${STATE_DIR:=/var/lib/healthcheck}"

SERVICES=("apache2" "postgresql")
# -----------------------------

log_line() {
    echo "[$NOW] $*" >> /var/log/healthcheck.log
}

send_alert() {
    local subject="$1"
    local body="$2"
    printf "%s\n" "$body" | mail -a "From: ${MAIL_FROM}" -s "$subject" ${ALERT_EMAIL} || true
}

rate_limited() {
    local key="$1"
    local stamp="${STATE_DIR}/${key}.stamp"
    local now
    now="$(date +%s)"

    mkdir -p "$STATE_DIR"

    if [[ -f "$stamp" ]]; then
        local last
        last="$(cat "$stamp" || echo 0)"
         now - last < ALERT_COOLDOWN_SECONDS  && return 0
    fi

    echo "$now" > "$stamp"
    return 1
}

fail() {
    local key="$1"
    local msg="$2"

    log_line "FAIL ${HOSTNAME_SHORT}: ${msg}"

    {
        echo "----- failure snapshot ($NOW) -----"
        uptime
        echo
        df -h
        echo
        free -m
        echo
        top -b -n1 | head -n 60
        echo
        ss -tulpn
        echo
        systemctl --failed
        echo "----------------------------------"
    } >> /var/log/healthcheck.log

    rate_limited "$key" && exit 1

    send_alert "[ALERT][Totara][${HOSTNAME_SHORT}] healthcheck failed: ${key}" \
"Time: $NOW
Host: ${HOSTNAME_FQDN}

Reason:
  ${msg}

See /var/log/healthcheck.log for diagnostics."

    exit 1
}

touch /var/log/healthcheck.log

disk_pct="$(df -P / | awk 'NR==2{gsub("%","",$5); print $5}')"
[[ "$disk_pct" -lt "$DISK_MAX_PCT" ]] || fail disk "Disk usage ${disk_pct}%"

cores="$(nproc)"
load_1m="$(awk '{print $1}' /proc/loadavg)"
awk -v l="$load_1m" -v c="$cores" -v t="$LOAD_PER_CORE_MAX" 'BEGIN{ exit !l/c)<=t) }' \
    || fail load "Load ${load_1m} on ${cores} cores"

mem_avail_mb="$(awk '/MemAvailable/ {print int($2/1024)}' /proc/meminfo)"
[[ "$mem_avail_mb" -ge "$MEM_AVAIL_MIN_MB" ]] \
    || fail memory "MemAvailable ${mem_avail_mb}MB"

for svc in "${SERVICES[@]}"; do
    systemctl is-active --quiet "$svc" \
        || fail "service-${svc}" "Service not active: ${svc}"
done

curl -fsS --max-time 10 "$HTTP_URL" >/dev/null \
    || fail http "Local HTTP check failed"

log_line "OK ${HOSTNAME_SHORT}"
exit 0
Active Directory SSO with SAML2 in Moodle requires installing an authentication plugin, exchanging metadata with your AD administrator, and careful mapping of claim types to user fields. This guide covers setup, testing against SAMLtest.id, and troubleshooting common claim mismatches.
Assumptions
This SOP makes the following assumptions:
The customer has an AD (Active Directory) based system.
They want their users to be able to access Moodle or Totara without logging in (or at the very least they should be able to use their ‘current’ username and password).
Their AD system supports SAML2
Make sure to check these assumptions with your users!
Terminology
Service Provider (SP): In our scenario, Moodle (or Totara) is the service provider – the application that provides the service the user wants to get access to.
Identity Provider (IdP): The customer’s system where the user is authenticated
Claims (or ClaimTypes): user attributes (properties of the user, i.e. information about the user)
Install SAML2 Plugin
Moodle does not support SAML2 out of the box (and neither does Totara). You have to install an authentication plugin: SAML2 Single sign on. If you don’t have access to the web server, try to install the plugin through the upload form for plugins: Site administration > Plugins > Install plugins. That should land you on this url: /admin/tool/installaddon/index.php.
Activate the SAML2 Authentication Plugin
Go to Site Administration > Plugins > Manage Authentication. You should end up on this page: /admin/settings.php?section=manageauths.
‘Enable’ the plugin by clicking on the eye icon (or something similar).
From this screen, you can also directly access the SAML2 plugin’s configuration settings by clicking on the Settings link.
Exchange Metadata with the Customer
Get IdP metadata xml or a public xml URL from the Customer
In order to configure the plugin, you need to exchange metadata with your users. Ask them for the IdP metadata xml or a public xml URL. This should be filled out here:
Sometimes your users will tell you what claims they’re providing (user attributes). In my experience, this information may or may not be accurate. Keep in mind that your users’s IdP metadata is authoritative. If a ClaimType isn’t mentioned there, it means it won’t be made available in Moodle either, through SAML2.
Please note that the reverse is sometimes also true: not all claim types that are mentioned in the IdP metadata are always automatically available. Apparently, the administrator of the IdP system has to ‘turn on’ the claim types or something like that.
Provide the Customer with the SP metadata
After you have done that, you should provide them with the SP (Service Provider) metadata, which can be obtained here:
Copy the url from the ‘View Service Provider Metadata’ link and give it to your users. They should know what to do with it, but just in case they ask you for it:
The Identifier (Entity ID) can be found in the attribute entityID of the SP Metadata.
For instance, in the following snippet, I have highlighted the entityID attribute:
N.B.: if you have trouble generating (accessing) the SP Metadata, wait till you have completed the remaining configuration (see the next section), then try again.
Configure the SAML2 Plugin
To configure the SAML2 plugin, take a close look at your users’s IdP metadata xml. What you need to extract from it, are the fields you need to map in Moodle.
These are the fields that you need at minimum: uid, email address, first name, and last name.
In my experience, these are typically called:
uid: uid, upn or objectidentifier (see subsection below)
But if you set ‘Simplify attributes’ to ‘Yes’ (the default), then you can use the much shorter names:
The defaults for the remaining configuration options are pretty sensible, although you might want to set ‘Auto create users’ to ‘Yes’, depending on whether the users already exist in Moodle or Totara. For testing purposes, set it to ‘Yes’.
Mapping IdP: uid, upn or objectidentifier
If you link accounts in two different systems (which is basically what SSO comes down to), then you need a way to uniquely identify a user in both systems. In SAML2, this typically done with one of the following attributes:
uid
upn (which stands for User Principal Name)
objectidentifier
The default in Moodle (and Totara) is to use uid, but this won’t work if the attribute (claimtype) is not actually present in your users’s IdP metadata xml.
So, find the appropriate attribute, and fill it in here, in Mapping IdP:
Attention: the claim types seem to be case sensitive. For instance, the DisplayName may contain capital letters which are missing in the actual ClaimType value. You should always use the actual ClaimType value.
Mapping to Custom Profile Fields
SAML2 fully supports mapping claim types to custom profile fields. In fact, if you have custom profile fields, they will automatically show up in the configuration screen of the plugin: /admin/settings.php?section=authsettingsaml2 (Site Administration > Plugins > Authentication > SAML2). The resulting field name will be something like: auth_saml2 | field_map_profile_field_isDocentTrainer.
Test the SAML2 Based SSO
All the SAML2 configuration is done and tested on staging. Ask your users for a test AD account, and try to login through SAML2.
If necessary, visit the /auth/saml2/test.php once you’ve got a saml2 based session going. You should see the details of the info the IdP is sending over.For instance, visiting https://www.contoso-learning.example/auth/saml2/test.php with my Microsoft test account (provided to me by the client’s IT staff) yields:
This is useful information, especially if the Claim Types the client is giving you are not actually working. The screen above shows the right names to use for mapping the IdP fields to Moodle fields.
From Staging to Production
Once the SAML2 configuration has been successfully tested, we have to move it to production. There are two procedures here: one for a new customer and one for an existing customer.
New Customer
In case of a new customer, after testing we then copy the staging environment to production. Because the domain for will be different, we have to provide your users with the new SP metadata url.
Existing Customer
For an existing customer, the procedure is:
Test the SAML2 configuration on staging.
Copy the settings from staging to production.
Provide your users with the SP metadata url for production.
Troubleshooting
Turn on the development and debugging mode. If you’ve reached a point where you can’t realistically test with your users’s AD system (e.g. because you’re not allowed to go in there), use this testing system:
Mapping IdP: uid – Which IdP attribute should be matched against a Moodle user field
Mapping Moodle: ID number (this is the mdl_user.idnumber attribute)
Data mapping (First name): givenName
Data mapping (Surname): sn
Data mapping (Email address): mail
Data mapping (ID number): uid
Please keep in mind that the IdP attribute will also be used to create the username. In the example above, the uid will be used as the username, and it will be used as the ID number.
You can test this by having a SAMLtest.id test user login, and then change their Moodle username afterwards – they will still be able to login through SAMLtest.id (because the SAMLtest.id login matches with the ID number, given the settings above).
In most scenarios, it’s superfluous to set the ‘Mapping Moodle’ to anything other than username, since the ‘Mapping IdP’ will be stored there anyway.
However, if you want to link existing Moodle accounts to external accounts, it may be easier to set ‘Mapping Moodle’ to idnumber. That way you only need to supply the external value of Mapping IdP to idnumber. You don’t need to change the existing Moodle username – which can be confusing to users.
‘Common’ Errors
You may have encountered this message on the login screen (/login/index.php):
Error: “Exception – Call to a member function export_for_template() on string”
We do not recommend this since it would be a core hack, but you could ask a developer to go to line 731 of /lib/authlib.php and comment out this part:
The reason behind this bug: when the IdP provides an icon, the variable $idp['icon'] is set to a string. But Moodle (or Totara) expects an instance of pix_icon there.
Troubleshooting
You can use an IdP service like https://idp.ssocircle.com/ to test saml2. But please keep in mind that you should only do that if you think the saml2 plugin is somehow not working properly (e.g. you just installed a new version of the plugin).
You’re building a Moodle plugin that calls a service on your local machine — a REST API, a microservice, an AI backend, a webhook handler. You send the request through Moodle’s built-in cURL wrapper. Nothing comes back. No connection error, just silence, or a vague failure in your plugin’s response.
The cause: Moodle blocks outbound cURL requests to localhost (127.0.0.1, ::1) by default. This is intentional — it guards against Server-Side Request Forgery (SSRF), where an attacker tricks the server into fetching internal resources. On production that protection is essential. On a local dev machine it just gets in the way.
This guide shows how to lift that restriction.
What you’ll see
With developer debugging enabled, Moodle logs a message from corefilescurl_security_helper indicating the URL was blocked. Without debugging, the cURL call silently returns false or an empty response with no further detail.
Fix: admin UI (recommended)
Go to Site administration > General > Security > HTTP security.
Step 1 — cURL blocked hosts list: clear this field entirely. When empty, Moodle skips the reserved-address check that blocks localhost.
Step 2 — cURL allowed ports list: confirm ports 80 and 443 are listed, then add the port your local service uses (e.g., 8000). If this list contains any entries at all, Moodle blocks every port not listed.
Step 3: click Save changes, then go to Site administration > Development > Purge all caches.
Fix: config.php (alternative)
If you can’t access the admin UI, or want a scripted setup, add these lines to config.php after the require_once(__DIR__ . '/lib/setup.php'); line:
$CFG->curlsecurityblockedhosts = '';             // empty = localhost not blocked
$CFG->curlsecurityallowedport  = '80,443,8000';  // add your dev port here
Then purge caches.
Verify
Retry the cURL call from your plugin. If it still fails, enable developer debugging (Site administration > Development > Debugging, set to DEVELOPER) and check the output for messages from curl_security_helper.
Don’t carry this into production
An empty blocked hosts list disables SSRF protection for all local addresses. On a production server, the list should contain at minimum:
Only remove entries if you have a specific, trusted internal service and understand the exposure.
OAuth2 in Moodle lets you delegate authentication to an external identity provider. This guide covers finding the correct endpoints, configuring the issuer and user field mappings, troubleshooting callback failures and missing user data, and working around Totara’s email verification requirement for custom services.
Finding the correct OAuth2 endpoints
For Moodle’s OAuth2 login to work, you need three endpoints from your identity provider: authorization_endpoint, token_endpoint, and userinfo_endpoint. IdP admins sometimes hand over a metadata URL rather than the individual endpoints. If the URLs you’ve been given don’t work, check whether they point to an OpenID Connect discovery document (a JSON file at a .well-known/openid-configuration path). That document contains all the endpoints you need.
For example, a Keycloak-based IdP might give you a discovery URL like this:
Copy the individual endpoint values into Moodle’s OAuth 2 service configuration. Note that even a correct endpoint set can still fail if the configured scopes don’t cause the IdP to include username and email in the userinfo response — that’s covered in the field mapping section below.
When Moodle redirects back from the identity provider and the user sees an invalidsesskey error, the problem is not with the authorization code itself. In Moodle’s callback flow, the state parameter carries a local return URL that contains a sesskey. Moodle extracts that sesskey and validates it against the current session. If the check fails, Moodle stores invalidsesskey as the login error and sends the user back to the login page.
This means the error is a session-continuity failure at callback time, not a generic OAuth2 problem. Several things can cause it.
Session cookie not sent on the callback. The most common cause is the browser not sending the Moodle session cookie on the cross-site return from the IdP. Check the SameSite attribute on the PHP session cookie. SameSite=Strict is a common culprit: browsers do not send Strict cookies on cross-site top-level navigations, which is exactly what an OAuth2 callback is. SameSite=Lax allows cookies on top-level navigations and is usually the right setting here.
wwwroot mismatch. If $CFG->wwwroot in config.php does not exactly match the URL in the browser address bar, including protocol and any path prefix, session validation can fail. A common variant is wwwroot set to http while the site is served over https.
Reverse proxy configuration. When Moodle sits behind a load balancer or reverse proxy that terminates SSL, the session may be keyed to a different server address than the one the browser sees. Make sure $CFG->reverseproxy and $CFG->sslproxy are set correctly in config.php to reflect the proxy setup.
Multi-node session storage. If the Moodle application runs on more than one node without shared session storage, the node that handles the callback may not have the session that was created when the login flow started. Shared session storage (database or cache) is required for OAuth2 to work reliably across nodes.
Why Moodle reports that the returned user information does not contain a username and email address
After the token exchange, Moodle calls the userinfo endpoint and tries to map the response fields to its internal user attributes. If it cannot find values for username and email, it shows this error. There are two distinct causes.
The IdP is not returning the expected claims. Some providers return email as “mail” or “email_address”. Some return the username equivalent as “preferred_username”, “upn”, “samaccountname”, or a custom attribute. Decode a sample token or inspect the raw userinfo response to see exactly what field names and values the provider is returning.
The Moodle field mappings do not match. Moodle needs to know which field in the userinfo response corresponds to its internal “username” and “email” fields. For OpenID Connect services, these mappings are often created automatically. For custom OAuth2 services they usually need to be added manually. Go to Site administration > Server > OAuth 2 services, open the service, and click “Configure user field mappings”.
A typical mapping table for a Microsoft Entra ID or ADFS provider might look like this:
Internal field name   | External field name (from userinfo response)
----------------------|---------------------------------------------
username              | preferred_username   (or: upn, samaccountname)
email                 | mail                 (or: email)
firstname             | given_name
lastname              | family_name
Mapping firstname and lastname is not required for login, but without them Moodle may force a profile-completion step after the first login.
How to verify the setup before testing login
Moodle includes a built-in test action that is worth using before attempting a full login flow. Go to Site administration > Plugins > Authentication > Manage authentication, find the OAuth 2 row, and click “Test settings”. This checks whether Moodle can reach the configured endpoints and returns the raw userinfo response from the provider.
Use the test output to confirm two things independently: first, that the provider is actually returning username and email claims in its userinfo response; and second, that the field names in those claims match the mappings configured in Moodle. Separating those two checks makes it much easier to diagnose whether a login failure is an endpoint problem, a mapping problem, or a callback session problem.
Issue with Email Verification in OAuth2 for Custom Services in Totara
Description of the Issue
When configuring OAuth2-based SSO in Totara, administrators may encounter an issue where the system enforces email verification for custom OAuth2 providers. Unlike predefined providers such as Google, Microsoft, and Facebook, custom services do not offer the option to disable the "Require email verification" setting in the user interface. This behavior results in user accounts being marked as "pending email confirmation," preventing successful logins.
Observations
This restriction does not apply to predefined OAuth2 services, where the "Require email verification" setting can be toggled.
In Moodle 4.5, this limitation has been addressed, allowing custom OAuth2 providers to disable email verification.
The issue stems from a default database configuration that requires email verification for custom services.
Example Scenario
Upon authentication via a custom OAuth2 provider:
A record is created in the oauth2_linked_login table with confirmed set to 0.
Users remain unable to log in until email verification is completed.
Suggested Remedy by Totara
Totara HQ has provided an unsupported workaround involving a direct database query. The query modifies the oauth2_issuer table to disable the email verification requirement for a specific OAuth2 service:
UPDATE [prefix]_oauth2_issuer
SET requireconfirmation = 0
WHERE name = 'name_of_issuer_here';
Important Notes:
Replace [prefix] with the database prefix used in the Totara installation (e.g., ttr or mdl).
Ensure that the name_of_issuer_here matches the exact name of the custom OAuth2 service.
Risks and Limitations
Totara does not support this approach as it bypasses a core security measure.
Directly modifying the database introduces a risk of unintended consequences and may compromise system security.
Any issues arising from this change will not be supported by Totara HQ.
Recommendations
Evaluate whether disabling email verification is essential for the specific use case.
If email verification must be disabled, proceed with the query cautiously, ensuring a backup of the database before execution.
Report the requirement to Totara HQ to encourage future support for this feature in the user interface.