Moodle 4.3 ships with multi-factor authentication (MFA) as a built-in admin tool. This guide covers enabling TOTP-based 2FA, configuring a grace period so users have time to set up the app, replacing the confusing default grace period message with something users can actually act on, and verifying the setup without risking locking yourself out.
Why an authenticator app, not email
Email-based codes are better than nothing, but they shift the second factor to a channel that may itself be compromised. If an attacker already has access to a user’s email account, an emailed code provides no meaningful protection. A TOTP app (Google Authenticator, Aegis, Microsoft Authenticator, or any compatible app) generates time-based codes that never leave the device. That is what makes it a genuine second factor.
This guide therefore disables the email factor entirely. There is no point offering a weaker alternative alongside a strong one, because users will gravitate toward whichever is easiest.
Before you start
Moodle 4.3 or later. MFA is built in as tool_mfa; no plugin installation needed.
Site administrator access.
A second Moodle administrator account that you can use to recover access if something goes wrong. Set up TOTP on that account before enforcing the policy.
Keep a non-incognito browser window with an active admin session open throughout. This is your safety net.
Step 1: Enable MFA
Go to Site administration > Plugins > Admin tools > Multi-factor authentication > Manage multi-factor authentication.
At the top of the page, check the box labeled MFA plugin enabled and save.
Step 2: Enable the Authenticator App factor
On the same Manage multi-factor authentication page, find Authenticator app in the factor list and click its Settings link.
Enable factor: Yes
Factor weight: 100
Save changes.
Step 3: Disable the Email factor
Back on the Manage multi-factor authentication page, find Email in the factor list and click its Settings link.
Enable factor: No
Save changes.
Step 4: Configure the Grace Period
The grace period factor allows users to log in for a set number of days without having completed MFA setup. During this window, Moodle prompts them to get the authenticator app configured. Once the grace period expires, they cannot log in until they have done so.
On the Manage multi-factor authentication page, find Grace period in the factor list and click its Settings link.
Enable factor: Yes
Grace period: this is a duration field. Enter a number and pick a unit from the dropdown. Set it to, for example, 5 with the unit days (a reasonable default). The shipped default is 1 week.
Save changes.
On the factor list page, make sure Grace period appears after Authenticator app in the order. Use the up/down arrow icons next to each factor to move it down if needed. This ensures Moodle checks whether a user already has the app set up before falling back to the grace period.
Step 5: Fix the grace period warning message
The default message users see during the grace period reads:
You are currently in the grace period, and may not have enough factors set up to log in once the grace period expires. Go to {$a->url} to check your authentication status and set up more authentication factors. Your grace period expires in {$a->time}.
This is unhelpful. Users do not know what “factors” are. The message also does not tell them what to actually do. Replace it with something clear and actionable.
Go to Site administration > Language > Language customisation. Select your language (for example, English (en)) and click Open language pack.
In the filter form, enter the following and click Show strings:
String identifier: setupfactors
Component: factor_grace
One result appears. In the Local customisation field, paste:
To keep your account secure, we require Two-Factor Authentication (2FA). Go to {$a->url} to set up an Authenticator app on your phone. You have {$a->time} left to do this. After this period, you will not be able to log in without it.
Click Apply changes and continue editing, then Save changes to the language pack.
The placeholders {$a->url} and {$a->time} are filled in by Moodle at runtime, so leave them exactly as written.
Step 6: Test without locking yourself out
Keep your admin session active in the regular browser. Then open an incognito or private browser window and log in as a regular user, either a dedicated test account or a colleague’s account with their permission.
Verify the following:
The grace period message appears after login and shows your custom text.
The link in the message takes the user to their MFA preferences page.
The user can scan the QR code with an authenticator app and complete setup.
After setup, logging out and back in prompts for the TOTP code and grants access once the correct code is entered.
If anything is misconfigured, your open admin session lets you correct it without getting locked out.
Once the full flow works, set up TOTP on your own admin account if you have not done so already.
When you switch a Moodle account from manual authentication to SAML2 single sign-on, any user who still has the “Force password change” flag set gets locked out. They cannot log in and cannot self-resolve it. This guide explains why it happens and how to clear it safely, in bulk.
The symptom
A user authenticates successfully through your identity provider, then instead of landing in Moodle they hit an error page:
You cannot proceed without changing your password, however there is no available page for changing it. Please contact your Moodle Administrator.
It is not a redirect loop, and it is not a failed login. SSO works; Moodle then refuses to let the user proceed. This typically appears right after you migrate a set of accounts from manual auth to saml2, or after a bulk user import that set the force-password-change flag.
Why it happens
Moodle stores a per-user preference, auth_forcepasswordchange, set to 1 when an account must change its password at next login. On every login, core checks this flag (lib/moodlelib.php). If it is set, Moodle wants to send the user to the change-password form, but only if the account’s auth method can actually change a password locally:
For manual accounts, the password is local, so Moodle shows the change-password form. Normal behavior.
For SAML2 (and other external SSO) accounts, the password is owned by the identity provider, not Moodle. The auth plugin reports that it cannot change passwords, so there is no form to send the user to. Moodle has nowhere to route them, so it stops with the “no available page for changing it” error.
The flag is harmless while the account is manual. It becomes a lockout the moment the account is switched to SSO without the flag being cleared first. So the accounts most affected are exactly those created or imported as manual with “force password change” ticked, then later moved to SAML2.
Finding affected users
The flag lives in mdl_user_preferences. To list SSO users who are currently carrying it:
SELECT up.userid, u.username, u.email
FROM mdl_user_preferences up
JOIN mdl_user u ON u.id = up.userid
WHERE up.name = 'auth_forcepasswordchange'
  AND up.value = '1'
  AND u.auth = 'saml2';
This is a read-only query and safe to run anywhere. It tells you the scope before you change anything.
Clearing the flag
The correct way to clear it is to delete the preference, which is exactly what Moodle does internally when a password change completes (unset_user_preference('auth_forcepasswordchange', $user) in login/lib.php). Setting the value to 0 also works at read time but leaves a stale row behind; deleting it is the clean equivalent of the core behavior.
Preferred: the Moodle way, per user. For one or a few accounts, edit the user’s profile (Site administration > Users > Browse list of users > select the user > Edit profile) and untick “Force password change”. This goes through Moodle’s API and purges caches correctly.
For a bulk fix, the safest route that still goes through the Moodle API is a short script run via admin/cli, iterating the affected user ids from the query above and calling unset_user_preference('auth_forcepasswordchange', $userid) for each. That clears the preference and invalidates the per-user preference cache the way the UI does.
If you clear it with direct SQL, understand the trade-off. A statement like:
DELETE FROM mdl_user_preferences
WHERE name = 'auth_forcepasswordchange'
  AND userid IN (SELECT id FROM mdl_user WHERE auth = 'saml2');
will remove the flag, but it bypasses Moodle’s caching: user preferences are cached, so you must purge caches afterwards (admin/cli/purge_caches.php) or affected users may still hit the stale flag until the cache expires. Direct writes to a production database should always be preceded by a backup and ideally run inside a transaction. The unset_user_preference route avoids all of this, which is why it is preferred over hand-written SQL.
Preventing it on the next migration
When you migrate a batch of accounts to SAML2, clear auth_forcepasswordchange as part of the same migration step, before or alongside the auth switch, so no account ever ends up SSO-authenticated with the flag still set. If you provision accounts from an upstream system (CRM, HR feed) that sets “force password change” by default, turn that off for accounts destined for SSO.
What not to reach for
admin/cli/reset_password.php does not help here: it only operates on manual-auth accounts and only sets a password, so it neither targets your SAML2 users nor clears the force-change flag. The fix is clearing the preference, not resetting a password that the identity provider owns.
When running a multilingual Moodle site with SAML2 single sign-on via the auth_saml2 plugin, you may need the login button label to appear in different languages based on the user’s interface language. Two approaches that look like they should work, do not:
Putting <span class="multilang" lang="en">...</span> tags into the “IdP label override” setting has no effect. The multilang filter only runs on content rendered through Moodle’s format_text() or format_string(). The auth_saml2 plugin passes the label directly from the database to the template without a filter pass.
Using the Language customization tool (Site administration > Language > Language customization) to override auth_saml2 language strings will not help for a custom label either. That tool only modifies strings defined in language files, not values stored as admin settings in the database.
The root cause: auth_saml2 stores the IdP label as a plain string in mdl_config_plugins and renders it via {{name}} in the login form template with no language awareness.
The correct approach: theme template override
The reliable solution is to override core/loginform.mustache in your Moodle theme and replace the dynamic {{name}} rendering with Moodle language strings defined in the theme.
Moodle’s {{#str}} Mustache helper always resolves against the current user’s interface language. By moving the label from a database-stored admin setting into theme language files, you get full multilang support through the standard Moodle mechanism.
Prerequisites
Template overrides must live inside a theme — there is no other mechanism in Moodle for overriding Mustache templates. If you are not already on a custom theme, create a minimal child theme before proceeding. Editing a third-party theme directly will get overwritten on the next theme update.
Drop the theme directory into theme/ and visit the Moodle notifications page to register it. You do not need to activate it as the default theme yet — do that once the template override is in place.
Step 1: Override the login form template
Copy lib/templates/loginform.mustache from Moodle core (its logical template name is core/loginform) into your theme at:
theme/yourtheme/templates/core/loginform.mustache
If your parent theme already overrides this template, copy from the parent theme instead of from core, so you preserve its customizations.
In the template, find the block that renders identity providers. The default Moodle core template renders the button label as:
For multi-IdP setups where each provider needs a distinct translated label, the loop approach breaks down because there is no per-provider identifier in the template context. In that case, bypass the generic loop and hard-code one button per provider, each pointing to a known URL and using a dedicated string key. This makes the template more tightly coupled to a specific IdP configuration, but gives you full label control per provider.
Step 2: Add language files
Create a language file for each language your site supports:
Each file defines the same string keys with translated values.
lang/en/theme_yourtheme.php:
<?php
defined('MOODLE_INTERNAL') || die();
$string['saml_login_label'] = 'Log in with your organization account';
lang/nl/theme_yourtheme.php:
<?php
defined('MOODLE_INTERNAL') || die();
$string['saml_login_label'] = 'Inloggen met uw organisatieaccount';
Moodle will automatically use the file matching the user’s current interface language. If no file exists for the user’s language, Moodle falls back to English.
Step 3: Purge caches
After deploying your changes, purge Moodle’s theme and template caches: Site administration > Development > Purge all caches.
Caveats
This approach fully decouples the login button label from the auth_saml2 admin setting. Once you override the template, the “IdP label override” field in the plugin settings has no effect on sites using your theme. You own the label entirely from the theme side.
If you later reconfigure auth_saml2 (add a new IdP, change metadata), you will need to update the template and lang files manually to match. This is a minor maintenance trade-off for a clean, built-in multilang solution.
Active Directory SSO with SAML2 in Moodle requires installing an authentication plugin, exchanging metadata with your AD administrator, and careful mapping of claim types to user fields. This guide covers setup, testing against SAMLtest.id, and troubleshooting common claim mismatches.
Assumptions
This SOP makes the following assumptions:
The customer has an AD (Active Directory) based system.
They want their users to be able to access Moodle or Totara without logging in (or at the very least they should be able to use their ‘current’ username and password).
Their AD system supports SAML2
Make sure to check these assumptions with your users!
Terminology
Service Provider (SP): In our scenario, Moodle (or Totara) is the service provider – the application that provides the service the user wants to get access to.
Identity Provider (IdP): The customer’s system where the user is authenticated
Claims (or ClaimTypes): user attributes (properties of the user, i.e. information about the user)
Install SAML2 Plugin
Moodle does not support SAML2 out of the box (and neither does Totara). You have to install an authentication plugin: SAML2 Single sign on. If you don’t have access to the web server, try to install the plugin through the upload form for plugins: Site administration > Plugins > Install plugins. That should land you on this url: /admin/tool/installaddon/index.php.
Activate the SAML2 Authentication Plugin
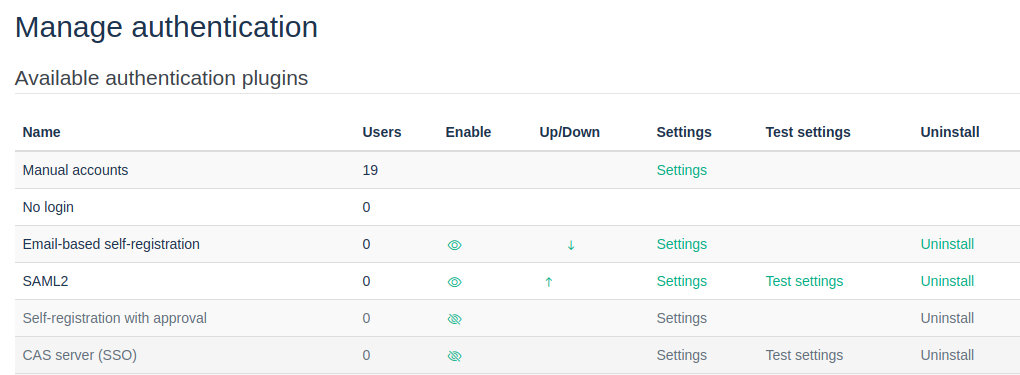
Go to Site Administration > Plugins > Manage Authentication. You should end up on this page: /admin/settings.php?section=manageauths.
‘Enable’ the plugin by clicking on the eye icon (or something similar).
From this screen, you can also directly access the SAML2 plugin’s configuration settings by clicking on the Settings link.
Exchange Metadata with the Customer
Get IdP metadata xml or a public xml URL from the Customer
In order to configure the plugin, you need to exchange metadata with your users. Ask them for the IdP metadata xml or a public xml URL. This should be filled out here:
Sometimes your users will tell you what claims they’re providing (user attributes). In my experience, this information may or may not be accurate. Keep in mind that your users’s IdP metadata is authoritative. If a ClaimType isn’t mentioned there, it means it won’t be made available in Moodle either, through SAML2.
Please note that the reverse is sometimes also true: not all claim types that are mentioned in the IdP metadata are always automatically available. Apparently, the administrator of the IdP system has to ‘turn on’ the claim types or something like that.
Provide the Customer with the SP metadata
After you have done that, you should provide them with the SP (Service Provider) metadata, which can be obtained here:
Copy the url from the ‘View Service Provider Metadata’ link and give it to your users. They should know what to do with it, but just in case they ask you for it:
The Identifier (Entity ID) can be found in the attribute entityID of the SP Metadata.
For instance, in the following snippet, I have highlighted the entityID attribute:
N.B.: if you have trouble generating (accessing) the SP Metadata, wait till you have completed the remaining configuration (see the next section), then try again.
Configure the SAML2 Plugin
To configure the SAML2 plugin, take a close look at your users’s IdP metadata xml. What you need to extract from it, are the fields you need to map in Moodle.
These are the fields that you need at minimum: uid, email address, first name, and last name.
In my experience, these are typically called:
uid: uid, upn or objectidentifier (see subsection below)
But if you set ‘Simplify attributes’ to ‘Yes’ (the default), then you can use the much shorter names:
The defaults for the remaining configuration options are pretty sensible, although you might want to set ‘Auto create users’ to ‘Yes’, depending on whether the users already exist in Moodle or Totara. For testing purposes, set it to ‘Yes’.
Mapping IdP: uid, upn or objectidentifier
If you link accounts in two different systems (which is basically what SSO comes down to), then you need a way to uniquely identify a user in both systems. In SAML2, this typically done with one of the following attributes:
uid
upn (which stands for User Principal Name)
objectidentifier
The default in Moodle (and Totara) is to use uid, but this won’t work if the attribute (claimtype) is not actually present in your users’s IdP metadata xml.
So, find the appropriate attribute, and fill it in here, in Mapping IdP:
Attention: the claim types seem to be case sensitive. For instance, the DisplayName may contain capital letters which are missing in the actual ClaimType value. You should always use the actual ClaimType value.
Mapping to Custom Profile Fields
SAML2 fully supports mapping claim types to custom profile fields. In fact, if you have custom profile fields, they will automatically show up in the configuration screen of the plugin: /admin/settings.php?section=authsettingsaml2 (Site Administration > Plugins > Authentication > SAML2). The resulting field name will be something like: auth_saml2 | field_map_profile_field_isDocentTrainer.
Test the SAML2 Based SSO
All the SAML2 configuration is done and tested on staging. Ask your users for a test AD account, and try to login through SAML2.
If necessary, visit the /auth/saml2/test.php once you’ve got a saml2 based session going. You should see the details of the info the IdP is sending over.For instance, visiting https://www.contoso-learning.example/auth/saml2/test.php with my Microsoft test account (provided to me by the client’s IT staff) yields:
This is useful information, especially if the Claim Types the client is giving you are not actually working. The screen above shows the right names to use for mapping the IdP fields to Moodle fields.
From Staging to Production
Once the SAML2 configuration has been successfully tested, we have to move it to production. There are two procedures here: one for a new customer and one for an existing customer.
New Customer
In case of a new customer, after testing we then copy the staging environment to production. Because the domain for will be different, we have to provide your users with the new SP metadata url.
Existing Customer
For an existing customer, the procedure is:
Test the SAML2 configuration on staging.
Copy the settings from staging to production.
Provide your users with the SP metadata url for production.
Troubleshooting
Turn on the development and debugging mode. If you’ve reached a point where you can’t realistically test with your users’s AD system (e.g. because you’re not allowed to go in there), use this testing system:
Please note: by default the selected IdP attribute is used as the Moodle username when a new account is created, unless you explicitly map the username field (see below). In the common setup, where no username field map is configured, the Mapping IdP value becomes the username.
Special Case: Mapping the IdP attribute to Something Other than Username
Mapping IdP: uid – Which IdP attribute should be matched against a Moodle user field
Mapping Moodle: ID number (this is the mdl_user.idnumber attribute)
Data mapping (First name): givenName
Data mapping (Surname): sn
Data mapping (Email address): mail
Data mapping (ID number): uid
Please keep in mind that the IdP attribute will also be used to create the username. In the example above, the uid will be used as the username, and it will be used as the ID number.
You can test this by having a SAMLtest.id test user login, and then change their Moodle username afterwards – they will still be able to login through SAMLtest.id (because the SAMLtest.id login matches with the ID number, given the settings above).
In most scenarios you can leave ‘Mapping Moodle’ as username, since by default the ‘Mapping IdP’ value is stored there for new accounts. Note that if you also configure an explicit username field map, that mapping takes precedence. Also, to link an incoming SSO login to an existing account created under a different authentication method, enable the plugin’s “Allow any auth type” option; otherwise matching to non-saml2 accounts can fail.
However, if you want to link existing Moodle accounts to external accounts, it may be easier to set ‘Mapping Moodle’ to idnumber. That way you only need to supply the external value of Mapping IdP to idnumber. You don’t need to change the existing Moodle username – which can be confusing to users.
‘Common’ Errors
You may have encountered this message on the login screen (/login/index.php):
Error: “Exception – Call to a member function export_for_template() on string”
The reason behind this error: when the IdP configuration provides an icon as a plain string, the identity-provider rendering code in lib/authlib.php expects a pix_icon object instead, and calling a method on the string throws the exception. This is version-specific: the exact code and line number differ between Moodle and Totara releases (and the code that produced this error in older versions has since been refactored), so do not rely on a fixed line number.
The clean fix is to make sure the IdP entry does not supply a bare-string icon (leave the icon field unset, or supply a valid icon), rather than editing core. If you do need a code-level workaround on an affected version, have a developer locate the icon-handling block in the identity-provider preparation method of lib/authlib.php for your specific version and neutralise the icon assignment there. Treat this as a temporary core hack and re-check it after every upgrade.
Troubleshooting
You can use an IdP service like https://idp.ssocircle.com/ to test saml2. But please keep in mind that you should only do that if you think the saml2 plugin is somehow not working properly (e.g. you just installed a new version of the plugin).
Rolling this out across your organization? Solin offers Moodle SSO integration services for SAML2 and Azure AD / Entra ID, delivered as a fixed-price project.
OAuth2 in Moodle lets you delegate authentication to an external identity provider. This guide covers finding the correct endpoints, configuring the issuer and user field mappings, troubleshooting callback failures and missing user data, and working around Totara’s email verification requirement for custom services.
Finding the correct OAuth2 endpoints
For Moodle’s OAuth2 login to work, you need three endpoints from your identity provider: authorization_endpoint, token_endpoint, and userinfo_endpoint. IdP admins sometimes hand over a metadata URL rather than the individual endpoints. If the URLs you’ve been given don’t work, check whether they point to an OpenID Connect discovery document (a JSON file at a .well-known/openid-configuration path). That document contains all the endpoints you need.
For example, a Keycloak-based IdP might give you a discovery URL like this:
Copy the individual endpoint values into Moodle’s OAuth 2 service configuration. Note that even a correct endpoint set can still fail if the configured scopes don’t cause the IdP to include username and email in the userinfo response, which is covered in the field mapping section below.
When Moodle redirects back from the identity provider and the user sees an invalidsesskey error, the problem is not with the authorization code itself. In Moodle’s callback flow, the state parameter carries a local return URL that contains a sesskey. Moodle extracts that sesskey and validates it against the current session. If the check fails, Moodle stores invalidsesskey as the login error and sends the user back to the login page.
This means the error is a session-continuity failure at callback time, not a generic OAuth2 problem. Several things can cause it.
Session cookie not sent on the callback. The most common cause is the browser not sending the Moodle session cookie on the cross-site return from the IdP. Check the SameSite attribute on the PHP session cookie. SameSite=Strict is a common culprit: browsers do not send Strict cookies on cross-site top-level navigations, which is exactly what an OAuth2 callback is. SameSite=Lax allows cookies on top-level navigations and is usually the right setting here.
wwwroot mismatch. If $CFG->wwwroot in config.php does not exactly match the URL in the browser address bar, including protocol and any path prefix, session validation can fail. A common variant is wwwroot set to http while the site is served over https.
Reverse proxy configuration. When Moodle sits behind a load balancer or reverse proxy that terminates SSL, the session may be keyed to a different server address than the one the browser sees. Make sure $CFG->reverseproxy and $CFG->sslproxy are set correctly in config.php to reflect the proxy setup.
Multi-node session storage. If the Moodle application runs on more than one node without shared session storage, the node that handles the callback may not have the session that was created when the login flow started. Shared session storage (database or cache) is required for OAuth2 to work reliably across nodes.
Why Moodle reports that the returned user information does not contain a username and email address
After the token exchange, Moodle calls the userinfo endpoint and tries to map the response fields to its internal user attributes. If it cannot find values for username and email, it shows this error. There are two distinct causes.
The IdP is not returning the expected claims. Some providers return email as “mail” or “email_address”. Some return the username equivalent as “preferred_username”, “upn”, “samaccountname”, or a custom attribute. Decode a sample token or inspect the raw userinfo response to see exactly what field names and values the provider is returning.
The Moodle field mappings do not match. Moodle needs to know which field in the userinfo response corresponds to its internal “username” and “email” fields. For OpenID Connect services, these mappings are often created automatically. For custom OAuth2 services they usually need to be added manually. Go to Site administration > Server > OAuth 2 services, open the service, and click “Configure user field mappings”.
A typical mapping table for a Microsoft Entra ID or ADFS provider might look like this:
Internal field name   | External field name (from userinfo response)
----------------------|---------------------------------------------
username              | preferred_username   (or: upn, samaccountname)
email                 | mail                 (or: email)
firstname             | given_name
lastname              | family_name
Mapping firstname and lastname is not required for login, but without them Moodle may force a profile-completion step after the first login.
External field names are case sensitive
The external field name in the mapping must match the casing returned by the provider exactly. Moodle does a case-sensitive lookup against the keys in the userinfo response, so a single wrong character means the value is silently ignored. Moodle will not warn you, the “Test settings” output will still show the value (because it lists the raw response, not the post-mapping result), and the only visible symptom is that the corresponding Moodle field stays empty after login.
This bites especially hard with Microsoft Graph, whose userinfo endpoint returns camelCase keys: givenName, userPrincipalName, surname, mail. If you enter givenname (all lowercase) as the external field name for firstname, the mapping will simply do nothing. Use the exact casing from the provider’s response:
Internal field name   | External field name (Microsoft Graph)
----------------------|---------------------------------------
username              | userPrincipalName
email                 | mail                 (or: userPrincipalName if mail is empty)
firstname             | givenName
lastname              | surname
OpenID Connect userinfo responses (Keycloak, Auth0, generic OIDC) use lowercase-with-underscores by convention (given_name, family_name, preferred_username), which is why the earlier example table looks different. Always inspect the actual userinfo response with “Test settings” and copy the field names character-for-character into the mapping.
How to verify the setup before testing login
Moodle includes a built-in test action that is worth using before attempting a full login flow. Go to Site administration > Plugins > Authentication > Manage authentication, find the OAuth 2 row, and click “Test settings”. This checks whether Moodle can reach the configured endpoints and returns the raw userinfo response from the provider.
Use the test output to confirm two things independently: first, that the provider is actually returning username and email claims in its userinfo response; and second, that the field names in those claims match the mappings configured in Moodle. Separating those two checks makes it much easier to diagnose whether a login failure is an endpoint problem, a mapping problem, or a callback session problem.
Issue with Email Verification in OAuth2 for Custom Services in Totara
Description of the Issue
When configuring OAuth2-based SSO in Totara, administrators may encounter an issue where the system enforces email verification for custom OAuth2 providers. Unlike predefined providers such as Google, Microsoft, and Facebook, custom services do not offer the option to disable the "Require email verification" setting in the user interface. This behavior results in user accounts being marked as "pending email confirmation," preventing successful logins.
Observations
This restriction does not apply to predefined OAuth2 services, where the "Require email verification" setting can be toggled.
In Moodle 4.5, this limitation has been addressed, allowing custom OAuth2 providers to disable email verification.
The issue stems from a default database configuration that requires email verification for custom services.
Example Scenario
Upon authentication via a custom OAuth2 provider:
The linked-login record is created in an unconfirmed state (in Moodle the table is auth_oauth2_linked_login, and the pending state is held by a non-empty confirmtoken rather than a confirmed flag).
The user cannot complete login until email verification is done.
Suggested Remedy by Totara
Totara HQ has provided an unsupported workaround involving a direct database query. The query modifies the oauth2_issuer table to disable the email verification requirement for a specific OAuth2 service:
UPDATE [prefix]_oauth2_issuer
SET requireconfirmation = 0
WHERE name = 'name_of_issuer_here';
Important Notes:
Replace [prefix] with the database prefix used in the Totara installation (e.g., ttr or mdl).
Ensure that the name_of_issuer_here matches the exact name of the custom OAuth2 service.
Risks and Limitations
Totara does not support this approach as it bypasses a core security measure.
Directly modifying the database introduces a risk of unintended consequences and may compromise system security.
Any issues arising from this change will not be supported by Totara HQ.
Recommendations
Evaluate whether disabling email verification is essential for the specific use case.
If email verification must be disabled, proceed with the query cautiously, ensuring a backup of the database before execution.
Report the requirement to Totara HQ to encourage future support for this feature in the user interface.
Need this set up for your users? Solin offers Moodle SSO integration services for OAuth2 and Google Workspace, delivered as a fixed-price project.
LDAP and SSO are fundamentally different approaches to user authentication in Moodle. LDAP performs credential lookups directly against a directory service; SSO delegates authentication to a centralized identity provider. Understanding the distinction helps you choose the right approach for your setup.
LDAP Authentication
With Moodle’s LDAP plugin, each Moodle instance authenticates users itself by querying an LDAP directory — typically an on-premises Active Directory server accessible over the local network. When a user logs in:
Moodle connects to the LDAP server and queries the credentials.
If the credentials match, Moodle checks whether the user account exists locally; if not, it creates one.
Moodle creates a session.
This works well when your LDAP server is on the same network as Moodle. It is not SSO — each Moodle instance authenticates independently, so a user with access to three instances must log in to each one separately.
Single Sign-On (SSO)
An SSO solution centralizes authentication in a dedicated identity provider (IdP) — such as Azure AD, Okta, or any SAML2-compatible service. When a user logs in to a connected application:
The application redirects the user to the IdP.
The user authenticates once at the IdP — or is recognized as already authenticated.
The IdP redirects back with the outcome and the user’s profile data.
Moodle checks whether the user account exists locally; if not, it creates one.
Moodle creates a session.
Moodle never sees the user’s credentials — it only receives the result from the IdP. If the same user then accesses a second Moodle instance, they are already authenticated at the IdP and pass through without logging in again.
Azure AD: LDAP Is Not Available by Default
Azure AD (Entra ID) is a cloud service and does not expose a traditional LDAP endpoint. To use LDAP with Azure AD, you would need to set up Azure AD Domain Services (AD DS) — a managed domain add-on that does expose LDAP. This is a complex configuration and carries meaningful security risk: exposing LDAP over the internet is roughly equivalent to opening a database port publicly.
For Azure AD environments, SSO via SAML2 or OIDC is the straightforward and recommended path. If you do need to evaluate AD DS, these references cover the setup:
You have an on-premises Active Directory server on the same network as Moodle.
You have a single Moodle instance, or separate logins per instance are acceptable.
Use SSO if:
Your identity provider is cloud-based (Azure AD, Okta, Google Workspace, etc.).
You have multiple Moodle instances or other applications that should share a single login.
You want to decouple Moodle from the specifics of where credentials are stored.
Deciding on an authentication strategy? Solin provides Moodle SSO and identity integration across SAML2, OAuth2, and LDAP, delivered as a fixed-price project.
LTI 1.3 is the standard that lets one system launch learning content that lives in another. A learner clicks a link in the system they already use, and a course or activity hosted elsewhere opens for them as though it were local, carrying their identity across and sending their grades back automatically. That lets you bring in a course another organization hosts, or share a course you host so that partners’ learners can take it without leaving their own environment. Both systems can be Moodle, but they do not have to be: the other end could just as easily be a different LMS or a specialist content or assessment provider.
Whichever direction you are setting up, it works the same way once you know which side plays which role, and the single most common reason a setup goes wrong is that the two roles, Platform and Tool, get swapped. This guide focuses on the Moodle side of the connection. It anchors that distinction first, then walks through registration, publishing, adding the launch link, and the launch errors you are most likely to hit.
Platform and Tool: the distinction everything depends on
The clearest way to hold the two roles in your head is to ask which site hosts the content and which site launches it.
The Tool is the site that hosts the content. It owns the course or activity and delivers it when it is launched.
The Platform is the site that launches the content. It is where the learner sits and clicks the link to open that course or activity.
The reason this trips people up so often is that the names feel backwards. “Platform” sounds like the big, primary system and “Tool” sounds like a small add-on, so the instinct is to make your own main Moodle the Platform and treat the other site as the Tool. But the roles are defined by who owns the content, not by which site feels more important. The Tool owns and serves the activity; the Platform is simply the place learners launch it from, which is usually your own everyday Moodle.
It helps to remember the older LTI 1.1 names, because they describe the roles more plainly. The Platform used to be called the Consumer, and the Tool used to be called the Provider. The Provider provides the content and the Consumer consumes it. If you keep “provider is the Tool” and “consumer is the Platform” in mind, the direction stops slipping.
LTI 1.3 term
Old LTI 1.1 term
What it does
Tool
Provider
Hosts the course or activity and delivers it when launched
Platform
Consumer
Where the learner clicks the link to launch it
The roles work the same way whatever sits on the other end, but they are easiest to lose track of when both sides are Moodle, because then nothing in the interface reminds you which role a given site is playing. You have to decide it and hold onto it. Everything else follows from that one decision, including the single rule that causes the most failed setups: the registration URL is generated on the Tool and pasted into the Platform, never the other way around. Generate it on the wrong site and the registration will not describe the two-system relationship you meant to set up, so it usually fails outright, often with a message about the result not being valid JSON or the host being blocked. Pasting a site’s own registration URL back into itself is a special case: it configures Moodle against itself, which is only useful if you are deliberately testing both roles on one site. In a real two-system setup it almost always means the direction has been lost.
This is the most common source of LTI 1.3 pain, and it plays out regularly in the community. In the moodle.org forums you will find launch and registration failures that look like certificate or JSON problems but come down to a reversed Platform and Tool assignment. Before you debug certificates, cookies, or firewalls, be certain which site is which.
The rest of the LTI 1.3 vocabulary
A few more terms come up during setup. You do not need to master them, but recognizing them makes the error messages easier to read.
Registration is the trust relationship between the Tool and the Platform. It is set up once, either dynamically or by hand, and it is what lets the two sites believe each other’s messages.
Deployment is a specific activation of the registered Tool inside the Platform. It identifies a trusted launch context, and dynamic registration normally creates it for you. It is separate from the actual course or activity you publish, which you select later through Content Selection or through the published content’s Launch URL and custom properties.
Launch is the moment a learner clicks the link on the Platform and is carried into the Tool’s content.
Line items and scores are the part of the standard that sends grades from the Tool back to the Platform.
Decide the direction before you touch a setting
Before changing anything, work out which side is the Tool and which is the Platform. Throughout this guide, Moodle A is the Tool (it hosts the content) and Moodle B is the Platform (it launches the content). The walkthrough shows both sides as Moodle because that is the case you can configure end to end yourself, but the other end is just as often a non-Moodle system. When it is, follow the Moodle-side steps here and use the equivalent screens on the other platform. Either way, your situation is one of two directions.
You are consuming content from another provider. Your learners live in your Moodle, but the course is hosted elsewhere, whether that is another Moodle, a commercial content provider, or a specialist tool. The other system is the Tool, your Moodle is the Platform, and the registration URL must come from the other system and be pasted into yours.
You are providing content to another organization. The course lives in your Moodle, but learners launch it from a partner or customer platform, which may or may not be Moodle. Your Moodle is the Tool, their system is the Platform, and you generate the registration URL and hand it over for their administrator to paste into their platform.
Requirements
Any LTI 1.3 setup assumes both sides can reach each other as real servers over HTTPS. In most cases that means public URLs with valid certificates. Private, VPN, or staging URLs can work too, but only if each server can actually resolve and reach the other and Moodle’s blocked-host settings permit the connection. In practice that means:
Both sites use HTTPS with certificates each server trusts.
Each server can actually reach the other’s domain. The usual culprits when this fails are URLs the other side cannot resolve or connect to: localhost, private IP ranges, VPN-only hostnames, or staging URLs that are not reachable from the other server.
When your Moodle is the Tool, it needs both the LTI authentication plugin and the Publish as LTI tool enrolment plugin enabled. Moodle requires the authentication plugin alongside the enrolment one; it is how remote learners are provisioned an account on the Tool.
When your Moodle is the Platform, it needs the External tool activity available.
Whatever runs on the other end must be LTI Advantage compliant, and ideally supports dynamic registration.
Step 1. Enable LTI on the Tool site
Do this on Moodle A, the site that will host and deliver the content.
Log in as an administrator.
Go to Site administration > Plugins > Authentication > Manage authentication and enable LTI.
Go to Site administration > Plugins > Enrolments > Manage enrol plugins and enable Publish as LTI tool.
Optionally, open Publish as LTI tool > Settings to review the defaults, including the provisioning mode that controls how remote learners get an account.
If you want the Tool to display inside an iframe on the Platform rather than in a new window, also enable Site administration > Security > HTTP security > Allow frame embedding. Depending on browser cookie behavior, iframe launches may still need extra cookie configuration, which is covered in troubleshooting.
Step 2. Register the Tool with the Platform
Dynamic registration is the simplest way to exchange the LTI 1.3 configuration between the two sites. You start on the Tool, finish on the Platform, and confirm back on the Tool.
This walkthrough uses dynamic registration, which is the recommended path whenever both sides support it. Manual registration is also possible, but it means exchanging the issuer, client ID, authentication and token URLs, public keyset (JWKS) URL, redirect URLs, and deployment ID between the two systems by hand. Use it only when the Platform cannot do dynamic registration.
On Moodle A, the Tool
Go to Site administration > Plugins > Enrolments > Publish as LTI tool > Tool registration.
Click Register a platform.
Enter a Platform name that will remind you which site it is, for example the customer or organization name, then click Continue.
On the Tool details tab, copy the Registration URL shown under Dynamic registration.
That URL belongs to the Tool. It is meant to be entered on the Platform, and nowhere else.
On Moodle B, the Platform
Go to Site administration > Plugins > Activity modules > External tool > Manage tools.
Paste the registration URL into the Tool URL or Add tool field at the top of the page, depending on your Moodle version.
Click Add LTI Advantage. Moodle contacts the Tool, exchanges keys, and imports the configuration.
The tool appears in the list, often as pending at first. Review its settings and activate it.
Confirm the registration on Moodle A
Return to Publish as LTI tool > Tool registration on the Tool. The registration should now show as active, with the Platform details and a deployment stored automatically. With dynamic registration you normally do not need to edit the platform or deployment details by hand.
Step 3. Publish a course or activity from the Tool
Registration establishes trust between the sites, but it does not yet share any content. Do this on Moodle A to expose a specific course or activity.
Open the course you want to share.
From the course navigation or More menu, choose Published as LTI tools or Publish as LTI tool, depending on your Moodle version.
On the LTI Advantage tab, click Add.
Under Tool to be published, select the course or activity.
Enable grade sync and user sync if you need them, and optionally set a maximum number of enrolled users.
Save. Moodle now shows a Launch URL and a Custom properties value for this published content.
Copy the Launch URL and the Custom properties value. You will need them if you add the link on the Platform by hand. The custom properties identify exactly which published item to open, and look like this:
id=fe3dfbec-bd5b-4532-8bd5-0804a7102631
Step 4. Add the launch link on the Platform
There are two ways to place the link on Moodle B. Content Selection is the cleaner option when the teacher on the Platform can log in to the Tool and pick the content interactively. Manual link creation is for when you need to hand someone a fixed launch URL and property value instead.
Preferred: Content Selection
Confirm the registered tool is active on the Platform.
In the course where the link should appear, add an External tool activity, or pick the preconfigured tool from the activity chooser.
Click Select content.
If prompted, log in to the Tool and link the account.
Choose the published course or activity, add it, then save and launch.
This is usually the cleanest route because Moodle fills in the correct launch parameters for you. It does require the person creating the link to have, or be able to create, an account on the Tool site. If that is not possible, use manual link creation instead.
Alternative: manual link creation
Use this when Content Selection is not practical, for example when another administrator sets up the link without access to the Tool. On the Platform:
Add an External tool activity and choose the registered Tool.
Enter an activity name, and paste the Launch URL if Moodle asks for it.
Expand the advanced settings and paste the full Custom properties value into Custom parameters.
Save and launch.
Copy the custom properties exactly. Do not confuse the published content id with the LTI deployment ID; they are different values, and Moodle labels each where it means it.
Step 5. Test the launch
Test as a normal learner, not only as an administrator, because provisioning and permissions behave differently for the two.
Log in to the Platform as a test learner and open the course.
Click the External tool activity and confirm you land in the Tool’s content.
Check that the correct course or activity opens.
If grade passback is enabled, complete something and confirm the grade returns to the Platform. Passback can be asynchronous, so it may arrive after a scheduled task runs rather than instantly.
If user sync is enabled, confirm the learner is provisioned or linked as expected on the Tool.
Troubleshooting
“The result was not valid JSON” during registration
This appears during dynamic registration when Moodle expected an OpenID configuration in JSON but got something else. The full message usually reads along these lines:
There was a problem fetching the OpenID configuration from the platform.
The result was not valid JSON.
This may also be caused by blocked hosts configuration.
The most frequent cause is the direction mistake from the top of this guide: the registration URL was generated on the wrong site, or pasted back into the same site. Confirm that the URL came from the Tool and went into the Platform. After that, check the other common causes:
One of the URLs points at localhost, 127.0.0.1, or a private range such as 10.x.x.x, 172.16.x.x to 172.31.x.x, or 192.168.x.x, which the other server cannot reach.
Moodle’s blocked hosts or cURL security settings are preventing the server-to-server request.
The remote site answers with a login, SSO, maintenance, WAF, or error page instead of the expected JSON.
HTTPS is broken, or the certificate is not trusted by the other server.
The registration URL is stale. Delete the partial registration and generate a fresh one on the Tool.
Invalid launch data: custom claim ‘id’ missing
The Platform launched the Tool without the custom parameter that says which published content to open. On the Tool, copy the Custom properties value from the published content, then on the Platform edit the External tool activity and paste it into Custom parameters. Save and launch again.
Unable to find deployment
The Tool received a launch for a deployment it does not recognize or trust. Confirm the registration is active on the Tool, that the deployment exists under it, and that the Platform is using the correct registered tool. If you created several similar tools, make sure the Platform is not pointing at the wrong one. Dynamic registration normally creates the deployment automatically, so if it is missing, re-running registration usually restores it.
JWT signature or key errors
A JWT or key error means Moodle cannot validate the signed launch message. The usual culprits are a keyset URL that is unreachable, or a registration that was partly deleted or recreated on only one side. Confirm both sites use the correct registered tool, that the JWKS keyset URLs are reachable, and that no proxy, firewall, CDN, or WAF is blocking them. If in doubt, remove the registration on both sides and run dynamic registration again from scratch.
No grades are returned
Grade passback has several switches that all have to be on. Check that grade services are enabled in the Tool registration, that the External tool settings on the Platform accept grades, and that the published content on the Tool has grade sync enabled. Then confirm the launched activity actually produces a grade and that Moodle’s scheduled tasks are running, since passback is often processed asynchronously rather than at the moment of completion.
The Tool will not display inside an iframe
If the launch works in a new window but not embedded in the course page, the problem is almost always iframes or cookies. Confirm Allow frame embedding is enabled on the Tool, that both sites use HTTPS, and that the browser is not blocking the third-party cookies the session needs. Some setups require the session cookie to be marked for cross-site use:
SameSite=None; Secure
Only apply that change once you understand the security implications, and test it on staging before touching production.
A quick diagnostic checklist
When a registration or launch fails, run down these questions before anything else. Most of them come back to the Platform and Tool distinction.
Which site is the Tool, and which is the Platform?
Was the registration URL generated on the Tool and pasted into the Platform?
Can each server reach the other’s domain over HTTPS, and is that URL resolvable from the other server?
Is either site using localhost, a private IP, or a VPN-only hostname?
Is Moodle blocking the host through HTTP security or cURL blocked-host settings?
Is the registered tool active on the Platform, and the registration active on the Tool?
Was the course or activity actually published on the Tool?
For manual links, were the custom properties copied into custom parameters exactly?
Summary
Get the roles right and the rest of LTI 1.3 falls into place. The Tool hosts the content. The Platform launches it. The registration URL always travels from the Tool to the Platform. Most confusing setup failures are one of three things: the two roles reversed, a URL the other server cannot reach, or the published content’s custom property mixed up with the deployment ID. Decide the direction first, and you will avoid nearly all of them.
Solin specializes in Moodle integrations and LTI content delivery, connecting Moodle to other platforms in either direction, whether the other end is Moodle, another LMS, or a specialist content or assessment tool. If you need a setup configured or a stubborn launch error diagnosed, we can help.
Integrating external tools at scale? Solin offers Moodle integration services covering LTI, web services, and custom connectors, delivered as a fixed-price project.